Slot items by attribute in a range
Available for Search, Browse, Campaigns, Collections, and Facet pages.
With ranged attribute-based slotting, merchandisers can now define position ranges instead of placing products one slot at a time.
This allows merchandisers to automatically place groups of items, such as new arrivals, sale products, or specific categories, across larger sections of a page while still letting Constructor’s ranking algorithms determine the best order within each range.
Combined with advanced attribute conditions using AND/OR logic, merchandisers can precisely control which products appear in each range without manually selecting individual items. The result is a scalable way to maintain consistent merchandising layouts across product discovery experiences, while still surfacing the most relevant products for shoppers.
How can I use attribute-based ranged slotting?
Using attribute-based range slotting, merchandisers can visually curate a product listing page (PLP) to look organized and appealing. For example:
- Curate the PLP by style where each row features a mix of products (e.g., sneakers, shorts, t-shirt, etc.).
- Organize rows by color (e.g., first three rows are red items, next three rows are blue, etc.).
- Feature different collection items (e.g., first two rows are beds from rustic collection, next two are with beds from all-white collection, etc.).
- Group similar products together in curated collections (e.g., Back to School can have a range of backpacks, lunchboxes, reusable water bottles, etc.).
- Keep new arrivals always in the first two rows of a collection page.
- Increase visibility for promotion items by placing them in the first few rows.
- Slot products from a specific brand in a premium range
How it works
Once you choose a desired context (e.g., a search query, browse category, or campaign), you will select the items you wish to slot in the range. This is done using advanced conditions. You can choose an attribute, select item_id to list out the specific items you wish to slot, or you can combine multiple attribute conditions and/or item lists with AND/OR logic.
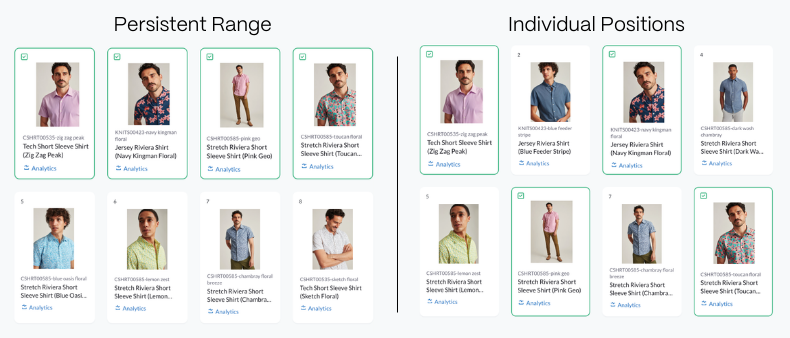
Then you will define your desired range. Here you have two options: you can set a persistent range (e.g., positions 1-8), or select individual positions (e.g., positions 1, 3, 5, 7, and 9). You can also mix these methods. If your range includes a position with an existing slotted item, that position will be skipped in the application of your rule.
When a shopper visits the page, Constructor’s algorithms will sort items defined (by conditions) within the range(s) you set, ensuring that the most attractive item for the shopper is in the first position. Items will be assigned to additional positions based on the ranking for the specific shopper.
For example, a retailer has a “Summer Vacation” collection. On the first page, they’ve slotted swimsuits in positions 1-4, sunglasses in positions 5-8, and sunhats in positions 9-12. When a shopper visits that collection page, they’ll first see a row of the most attractive swimsuits that Constructor has identified based on what Constructor knows about that shopper’s preferences (e.g., brand, color, price, etc.). The most attractive swimsuit will be in position 1 and positions 2-4 will show the next three most attractive swimsuits.
Important to know
- The maximum number of slotted positions per ranged rule is 50.
- The maximum number of ranged slotting rules per results page is 5.
- The maximum total positions across all ranged slotting rules in a single context or campaign is 250.
- If you define more positions than there are matching items, then the matching items will fill the range starting from the first defined position and any remaining positions will be filled organically by Constructor's ranking algorithm. For example, you define a range of 1-20 where the
coloris blue, but there are only 15 blue items. Constructor will slot the 15 blue items in potions 1-15, then populate the remaining slots (16-20) with relevance-ranked results.
Create an attribute-based ranged slotting rule
Step 1: Choose a context
Context refers to the results page for which you are creating the rule. For example, a search query, browse category, facet, or collection.
Want to apply the rule across multiple contexts?You’ll need to create a campaign. Follow steps 1-3 in our campaign article, then jump back here for steps 2-4.
- Select Workspace in the side menu of your Constructor dashboard, then select Searchandising.
- Select + Add New Rule in the top-right corner of the page.
- On the pop-up, choose the context for which you wish to create the rule:
- If you select Search, then choose the desired search query from the list provided. Select Continue to proceed.
- If you select Browse, choose Category, Facet, or Collection. Select the desired option from the list provided. Please only select one category/facet/collection. Select Continue to proceed.
- If you select Campaign, choose the various queries and browse experiences to include in the campaign. Learn more here.
Step 2: Configure rule
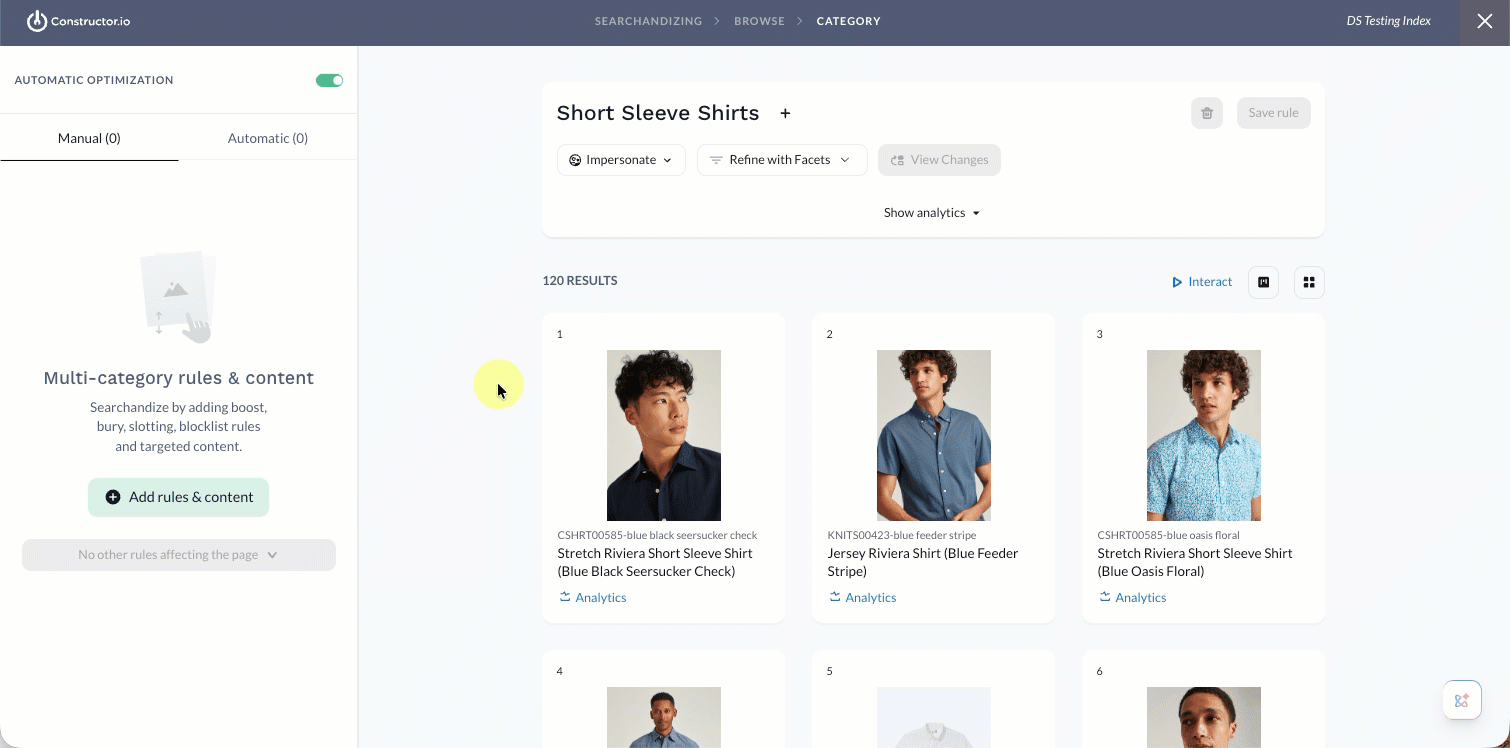
- Select Add rules & context in the side menu.
- In the Rerank section, select Ranged Slotting.
Select items

- Select Select items in the side menu.
- On the pop-up, define the conditions for your desired items:
- Add new condition: Defaults to the OR option, which adds more item options to the recall. You can select more than one
- For example, the condition "If Item ID is 123 OR Item ID is 456" adds more items to a recall.
- You can select multiple attribute variant options in a single condition statement. For example, “If Base Color is Pink, Red, Blue”
- Add new condition: Defaults to the OR option, which adds more item options to the recall. You can select more than one
- Add nested condition: Defaults to the AND option, which provides more specificity to the initial condition and narrows down the item options added to the recall.
- For example, the filter "If Item ID is 123 AND Color is Red" specifies that the item must be item 123 and the Red variant, narrowing the item options added to the recall.
- Select Preview in the bottom-left corner of the pop-up to view a list of items matching your defined conditions.
- Select Continue in the bottom-right corner of the pop-up.
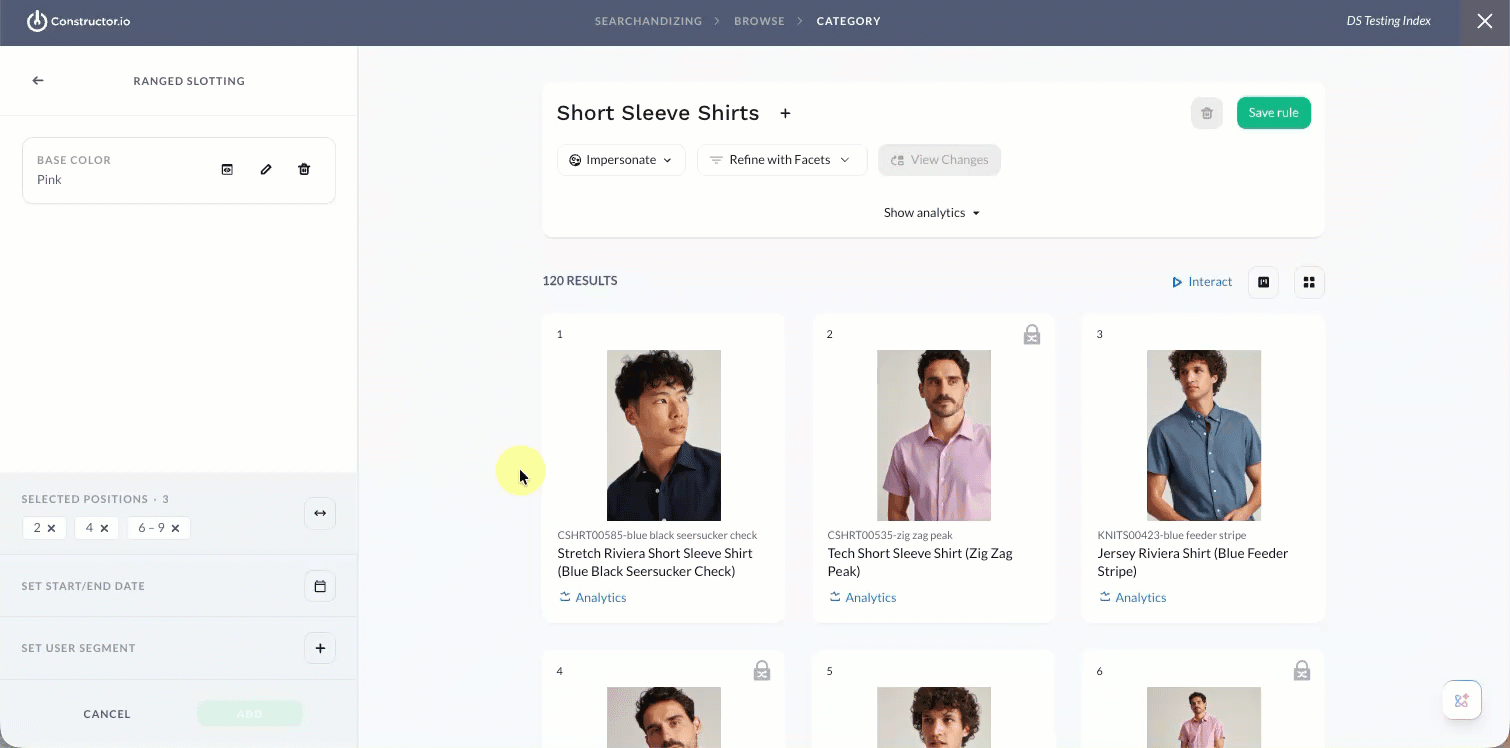
Define slotting positions
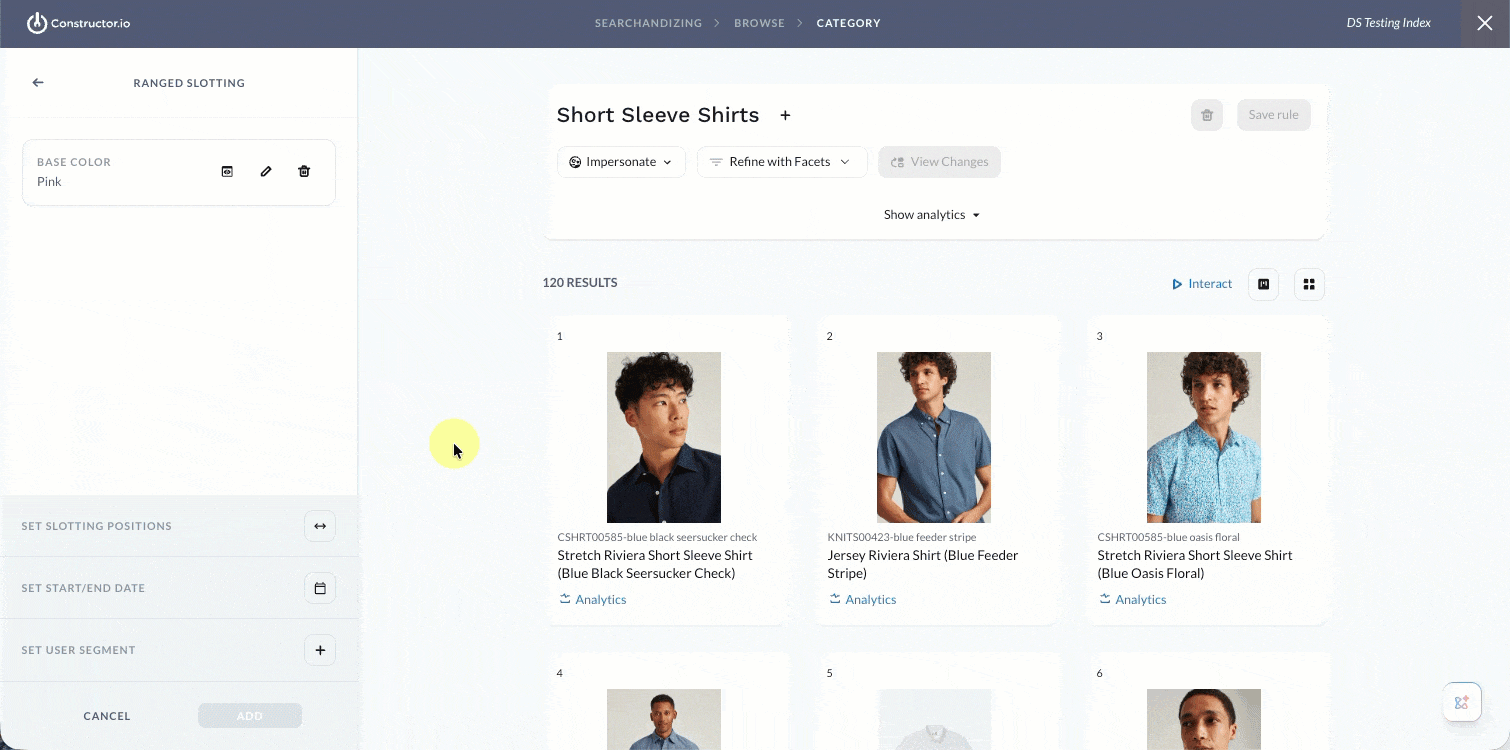
- In the side menu, select the arrow icon in the Set Slotting Positions section.
- You have two options when selecting positions:
- Select a tile: Hover over an item and select the checkbox in the top-right corner of the item tile. The position number will automatically appear in the side menu.
- Define a range: Use the drop-downs at the top of the page to define a Start Position and End Position. When done, click Select on the right side of the page to add the range of positions to the side menu. You can repeat this step multiple times to define different ranges.
- Note: If a position has a slotted item assigned in an existing slotting rule, then the tile will appear grayed out and you will be unable to select it in either position drop-down.
- If you need to remove a slotted position or range, you can deselect the item tile(s) or select the X beside the position number in the side menu.
- Once you have defined your slotted positions, select Add at the bottom of the side menu.
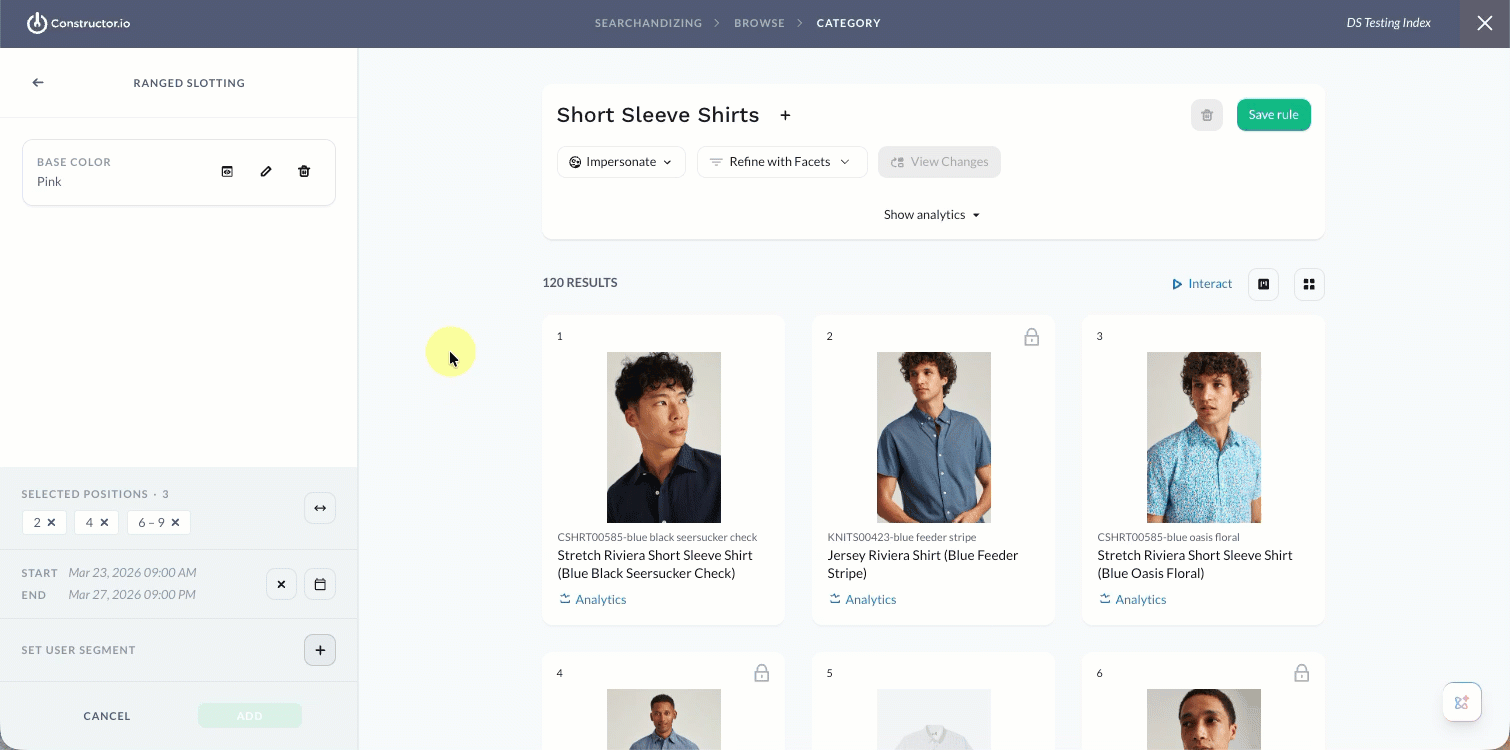
Add start/end dates
You can add a Start Date and End Date to the rule, which allows you to time box the rule's impact on returned results. Dates are not required. You can also define a start date without a set end date. Start date will always default to the current date.
- In the side menu, select the calendar icon in the Set Start/End Date section. This will launch a pop-up where you can define start and end dates and times.
- Dates: Select either Date field to launch a calendar picker, which allows you to choose a specific start and end date.
- Time: Once you define a date, a default start or end time will populate in drop-down fields to the right of the date fields. Use these drop-downs to edit the start and end times (hour, minute, AM/PM). Times are in the time zone displayed beneath the fields.
- Once done, select Apply in the bottom-right corner of the pop-up.
Preview results for a future dateIf you applied a Start Date in the future, then the Searchandising preview will not show the changes specified by the rule. To preview the experience, head to Interact, choose the specific context (e.g., search query, browse category, etc.), then choose the start date on the results page.
Add segment
Add a user segment
You can apply the rule to a specific subset of users by defining a user segment. Available segments include geo-based segments, segments provided using the us parameter, and AI-generated segments (e.g., RFM, Affinity, etc.).

- In the side menu, select the user icon in the Set User Segment section.
- On the pop-up, select your desired segment.
- Use the Search field to search for the segment by name.
- Select any of the segment categories (e.g., Affinity, RFM, Location, etc.) to view available segments.
- Note: Analytics for a segment reflect the behavior of the users included in the individual segment over the last 30 days.
- Select Continue in the bottom-right corner of the pop-up.
Impersonate a segment to preview resultsIf you've applied a segment to a rule, you will need to impersonate that segment to view the results in the Searchandising preview. Select Impersonate at the top of the page, then select the applied segment. The results will refresh and display the designated changes.
Step 3: Save rule
Once done, select Save Rules in the top-right corner of the page to save the rule.
Updated 4 months ago