Site Genesis: Catalog integration
The Constructor Salesforce Cartridge facilitates synchronizing catalog data from your Salesforce instance (Site Genesis) to Constructor.
This cartridge simplifies the connection and upload of your Salesforce product catalog to Constructor, enabling seamless integration of all product data from Salesforce into Constructor solutions. It empowers an e-commerce team in real time by identifying optimization opportunities. Additionally, the cartridge can be customized to suit specific requirements.
This article illustrates how to setup and use the cartridge.
Heads upThis documentation covers the catalog integration for Site Genesis.
If you're using SFRA, please refer to this page.
⚠️ Legacy note
This version of the cartridge is kept as a legacy version. While it is supported, we do recommend migrating to the SFRA version once you can. This upgrade will bring much better performance, flexibility and scalability.
Some things were heavily changed from this version to the Site Genesis version. A full migration guide that highlights every major change can be found here: Migrating from the Site Genesis cartridge to SFRA cartridge.
Requirements
First of all, you need to obtain the source code for the cartridge. You can download it through our official Salesforce AppExchange Listing, and see all details on Installing the Constructor Connect cartridge.
For assistance with the installation process, please contact our team at [email protected]. We’ll be glad to guide you through the installation steps beyond what is covered in this document.
Cartridge jobs
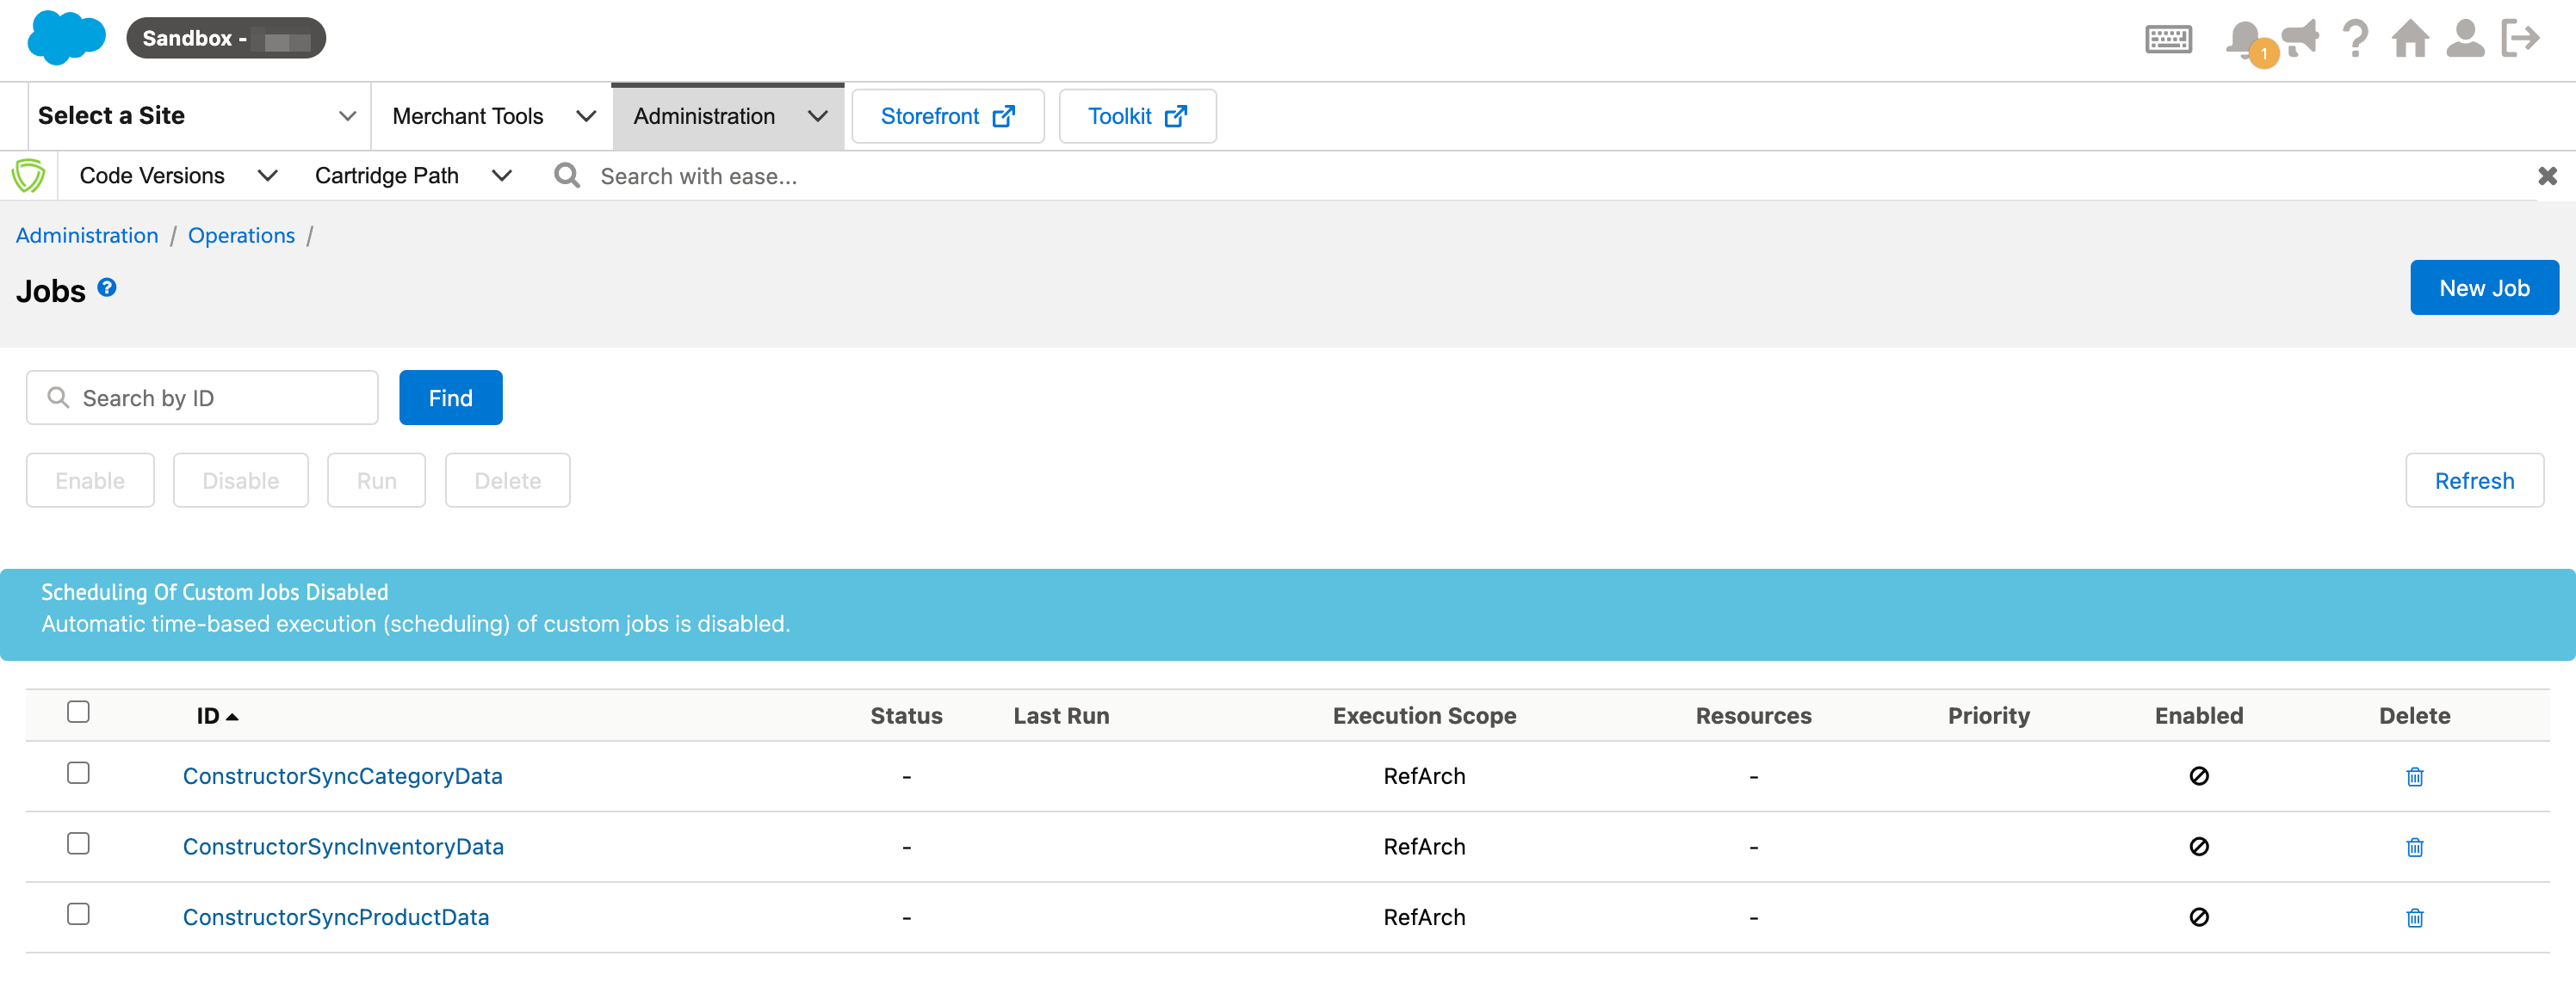
To use the cartridge, go to Administration > Operations > Jobs. There, you'll find that the cartridge exposes three main jobs:
ConstructorSyncCategoryData: Sends all category data to Constructor.ConstructorSyncProductData: Sends all product data (products, variants, etc) to Constructor.ConstructorSyncInventoryData: Sends partial product data to Constructor, mainly used for inventory data. Can also be used to partially update product fields, such as availability, price, etc.
You can easily create more jobs if needed by customizing the cartridge, depending on your needs.

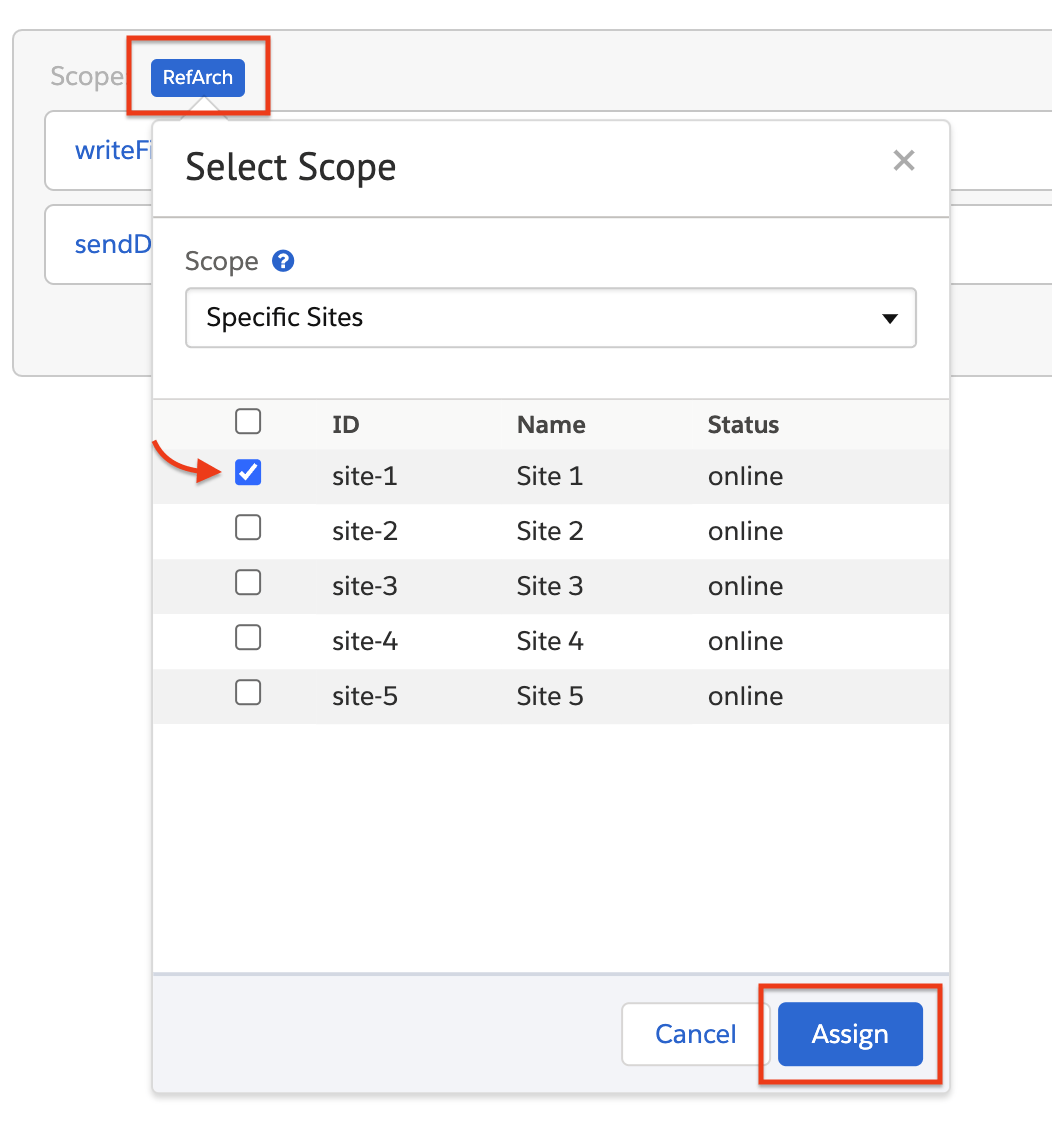
For each job, you'll need to go to the job steps and select the site to run the job against.


Job execution order mattersPay attention to the order you're going to run the jobs on.
Initially, make sure to run the categories job first so that when you send products, your category data is already available and populated in Constructor.
That's it. You can run these jobs manually or set up a schedule to run it periodically. Each time the job is run, the selected data for this site will be synced to Constructor.
ConstructorSyncCategoryData
ConstructorSyncCategoryDataThis job will send all category data to Constructor. Category hierarchy will be preserved.
Parameters can be provided via job steps:
writeFiles.Locale: The locale to fetch data from. Falls back to the site's default locale.writeFiles.WriteFolder: The folder to write temporary data into.sendDeltas.ApiKeyOverride: Allows overriding the API key provided in the site preferences to send data to a different index.sendDeltas.FileAction: The action to take with the generated temporary files. Options areARCHIVE,DELETE,KEEP. Defaults toARCHIVE.sendDeltas.ArchivePath: The path to use in case files will be archived.sendDeltas.ErrorPath: The path to use in case the job has any errors.
ConstructorSyncProductData
ConstructorSyncProductDataThis job will send all product data to Constructor. This includes simple products, product sets, master products and variants.
Note that Salesforce variation groups will not be sent. If you want to expose variation group data to your catalog, you should add it as metadata to your master products or variations during the data transformation.
Parameters can be provided via job steps:
writeFiles.PartialByLastSyncDate: Toggles the partial sync by last sync date. See the partial syncs section below for more details.writeFiles.SendOfflineVariants: If enabled, the cartridge will send all variants that belong to a master product if here are any matches. This will impact performance.writeFiles.IncludeMasterProductsOutOfStock: If enabled, the cartridge will send all online master products, even if they are out of stock. This will heavily impact performance.writeFiles.Locale: The locale to fetch data from. Falls back to the site's default locale.writeFiles.SearchPhrase: Filter to only send products based on a search phrase.writeFiles.CategoryId: Filter to only send products that belong to a specific category. Will include all subcategories.writeFiles.Ids: Filter to only send products that match a list of ids (comma separated). You can use IDs for master products, product sets, variation groups or variations. Can have a maximum of 30 IDs.writeFiles.WriteFolder: The folder to write temporary data into.sendDeltas.ApiKeyOverride: Allows overriding the API key provided in the site preferences to send data to a different index.sendDeltas.FileAction: The action to take with the generated temporary files. Options areARCHIVE,DELETE,KEEP. Defaults toARCHIVE.sendDeltas.ArchivePath: The path to use in case files will be archived.sendDeltas.ErrorPath: The path to use in case the job has any errors.sendDeltas.Section: The index section to write data to. Defaults toProducts.
ConstructorSyncInventoryData
ConstructorSyncInventoryDataThis job will send all inventory data to Constructor. It's also capable of sending any other product data present in the full products job, such as prices, normal fields and any other metadata.
This job uses the same query as the products job, so you can share any logic on how to fetch and filter products there.
For inventories, it's fetched from the assigned inventory record of each product, and the ATS value will be sent. You can customize this if needed. For example, you might want to send a different inventory attribute or fetch your inventory from a different source.
Parameters can be provided via job steps:
writeFiles.PartialByLastSyncDate: Toggles the partial sync by last sync date. See the partial syncs section below for more details.writeFiles.SendOfflineVariants: If enabled, the cartridge will send all variants that belong to a master product if here are any matches. This will impact performance.writeFiles.IncludeMasterProductsOutOfStock: If enabled, the cartridge will send all online master products, even if they are out of stock. This will heavily impact performance.writeFiles.Locale: The locale to fetch data from. Falls back to the site's default locale.writeFiles.SearchPhrase: Filter to only send products based on a search phrase.writeFiles.CategoryId: Filter to only send products that belong to a specific category. Will include all subcategories.writeFiles.Ids: Filter to only send products that match a list of ids (comma separated). You can use IDs for master products, product sets, variation groups or variations. Can have a maximum of 30 IDs.writeFiles.WriteFolder: The folder to write temporary data into.sendDeltas.ApiKeyOverride: Allows overriding the API key provided in the site preferences to send data to a different index.sendDeltas.FileAction: The action to take with the generated temporary files. Options areARCHIVE,DELETE,KEEP. Defaults toARCHIVE.sendDeltas.ArchivePath: The path to use in case files will be archived.sendDeltas.ErrorPath: The path to use in case the job has any errors.sendDeltas.Section: The index section to write data to. Defaults toProducts.
Partial updates by last sync date
The cartridge will expose a custom site preference to track the last time a sync job was ran without filters, for each specific locale. This is used to support partial syncs, where it'll only send information from records that were updated
since the last relative job completed to achieve maximum performance.
Those dates are updated automatically, so you should not update this field manually. Only update these fields if you want to manually force a full sync, by clearing up the last sync date for a given job.

last sync dates
Note that all dates stored on this field are defined in UTC.
Ingestion strategies
On the custom site preferences, you also have the Ingestion Strategy option for products, categories, and inventory data.

ingestion strategies
The ingestion strategy to be used when sending data to Constructor:
- Full (Replace): Will replace the entire catalog with the data sent. Records not present on the feed will be deleted in Constructor.
- Patch (Update): Will update only the items that were sent by the cartridge. Does not delete any records.
- Patch Delta (Fail in case of additional items): Similar to a patch, will partially update the catalog with the data sent, but does not require all fields. Fails if additional items are sent.
- Patch Delta (Create additional items): Similar to a patch, will partially update the catalog with the data sent, but does not require all fields. Will create any additional items sent.
- Patch Delta (Ignore additional items): Similar to a patch, will partially update the catalog with the data sent, but does not require all fields. Will ignore any additional items sent.
Customizing your catalog data
Normally, when using the cartridge you'll need to customize your catalog data to some extent. This can mean adding metadata, customizing other fields (for example the product URLs or image URLs), indexing new data (such as blog posts or recipes) and so on.
The cartridge supports a huge flexibility on customizations. To do this, you'll want to create overlays to modify portions of the source code while still maintaining the original source code available, which makes updating the cartridge easy.
The out of the box installation already provides a base cartridge to add your overlays on, called link_constructor_connect_custom. You'll want to add your customizations there.
DisclaimerWhile you can directly modify the cartridge files and customize them, we highly recommend implementing any customizations using overlays.
This will make future updates much easier to perform as you won't have to sort through diffs between many versions.
To add any overlays, look for the file responsible for the behavior you want to change. Files are organized in major behaviors and data flows in a verbose manner - for example:
categoryTransformer.jscustomizeProductData.jscustomizeItemMetadata.jscustomizeVariationMetadata.js
Don't forget to re-uploadWhen you add an overlay or any other customization, don't forget to re-upload the cartridge so that your changes take effect.
Adding metadata
Adding metadata to items and variations is as easy as changing the customizeItemMetadata.js file. For example:
function getItemMetadata(product) {
  return [
    {
      key: "searchableIfUnavailable",
      value: product.searchableIfUnavailable,
    },
  ];
}

module.exports.getItemMetadata = getItemMetadata;
Updated 4 months ago