Create an automated campaign
Automated campaigns streamline the campaign creation process by allowing your team (or trusted advertisers with access to the Advertiser Dashboard) to focus on core elements of a campaign: the items you wish to promote, maximum cost-per-click (CPC bid), and campaign goal.
Constructor handles analyzing the items you selected and the campaign goal you entered to identify and secure the most effective placement on related search results pages, browse pages, and recommendation pods. Learn more about automated campaigns.
Step 1: Define campaign settings
- Select Workspace in the side menu of the Constructor dashboard, then select Retail Media.
- Select Add new campaign in the top-right corner of the page.
- On the pop-up, select Sponsored listing.
- In the Advertiser section, select the desired advertiser from the drop-down list.
- In the Campaign Type section, select Automated.
- In the Strategy section, select the desired strategy:
- Maximize Performance: Maximize revenue generated for every dollar spent (ROAS). Ideal for campaigns focused on sales performance.
- Increase Visibility: Prioritizes ad impressions and presence across relevant contexts (e.g., queries, browse pages, etc.). Ideal for campaigns focused on brand awareness or product launches.
- Select Next in the top-right corner of the page.
Step 2: Select items to promote
When selecting items to promote, you can search for items by name or ID, by browse pages, or by scrolling through the listing.
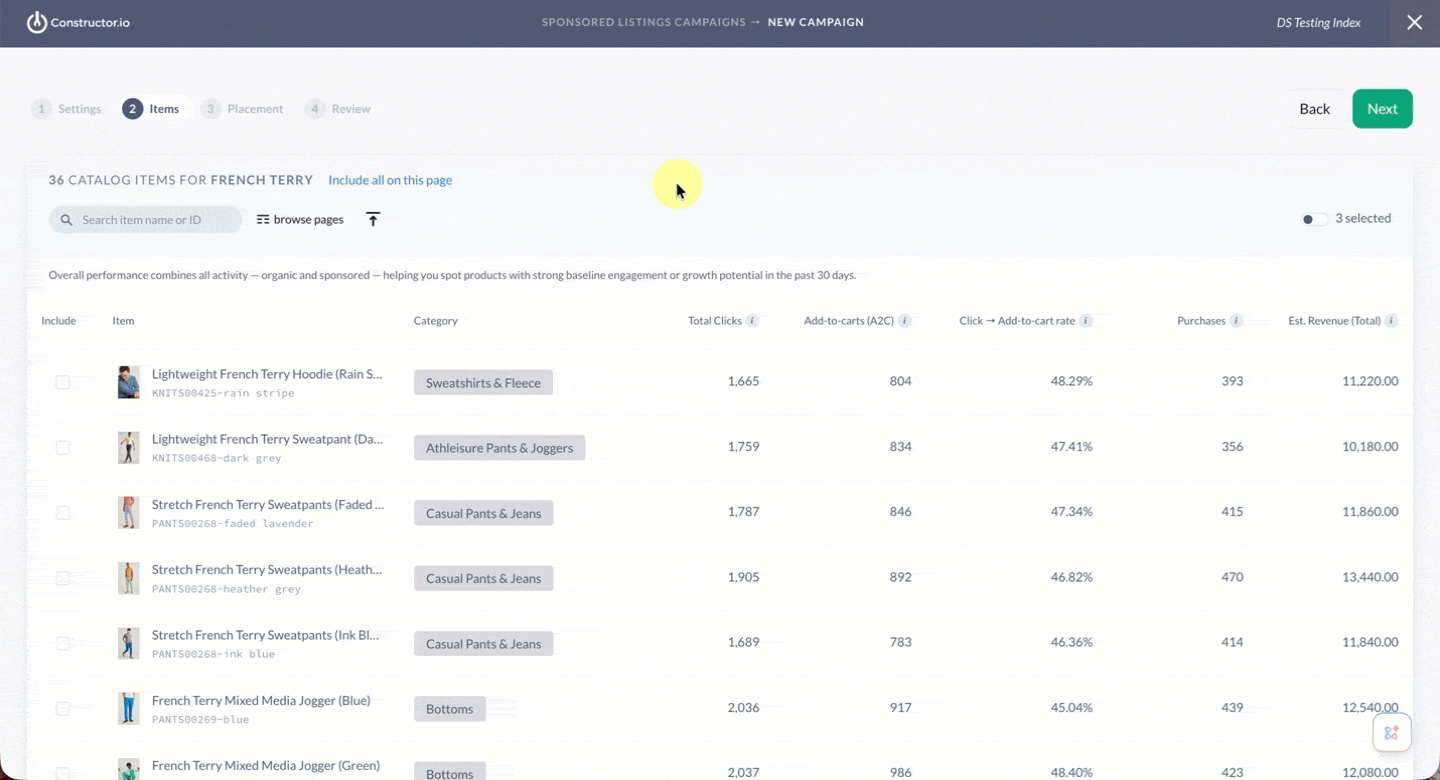
- To search for a specific item, enter the item name or item ID in the search field at the top of the item listing.
- To choose items by browse page, select the Browse Pages filter at the top of the item listing.
- A pop-up with a drop-down list of available browse pages will appear. Choose the browse page(s) whose items you wish to view by selecting the checkmark to the left of each browse page name, then select Apply.
- Note: Selecting a browse page during this step simply helps you choose which items to sponsor. It has no impact on the actual browse page. That step comes later.
- To upload a CSV of items to promote, select the upload icon at the top of the item listing.
- You will automatically be prompted to choose a file from your device.
- You can select Download template to download a template file to your device.
- When you locate an item to promote, select the checkbox to the left of the item name.
- Alternatively, you can select Include all items on this page to select all items visible in the item listing.
- Once you’ve selected all the items you wish to promote, select Next in the top-right corner of the page.
View selected itemsFor a filtered view that shows only the items you’ve selected to promote, select the # selected toggle in the top-right corner of the item listing.
Step 3: Select placement(s) and enter max CPC bid
Placement refers to the context where the sponsored items will appear (e.g., search, browse, recommendations). Constructor will choose the specific queries/keywords, pages, and pods to target within those contexts. Learn more about automated campaign placements.
For each context, you will also need to define your max cost-per-click (CPC) bid. Learn more about CPC bids.
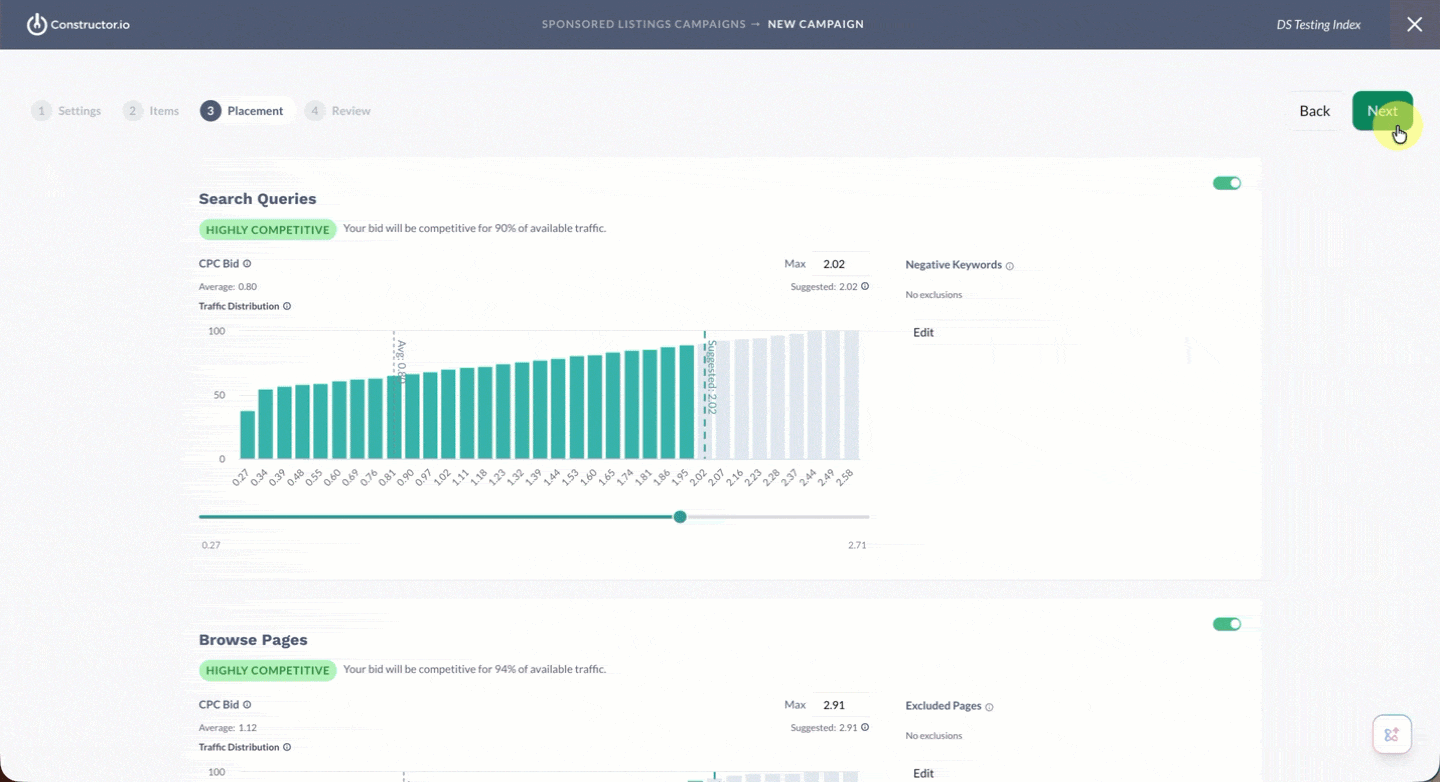
- To include a context in a campaign, select the toggle in the top-right corner of each context (e.g., search queries, browse pages, etc.) so it appears green.
- Use the Max field to manually adjust the CPC.
- Constructor will auto-populate a recommended CPC that allows you to stay competitive for the volume of traffic noted in the Traffic Distribution graph. You can use the slider to adjust the CPC to become competitive to a larger volume of traffic.
- To exclude specific keywords, pages, or pods from the campaign, select the Edit button on the right side of each section.
- For keywords, you can enter keywords individually or in bulk using the tabs on the pop-up. You can also define whether to exclude exact matches or searches containing the keyword. Once done, select Save.
- For pages, use the listing to select each browse page you wish to exclude from the campaign. Once done, select Save.
- For pods, use the drop-down to select which pods you wish to exclude. Names reflect the name given to a pod upon creation. Once done, select Save.
- Select Next in the top-right corner of the page.
Step 4: Review campaign and budget
Your last step is to review your campaign details and set your daily budget. Your daily budget reflects the amount you wish to spend per day to promote items within the campaign.
Once a campaign reaches its daily budget amount, all campaign efforts are automatically paused. This means all promotions for items within the campaign stop. Campaigns automatically resume at midnight UTC.
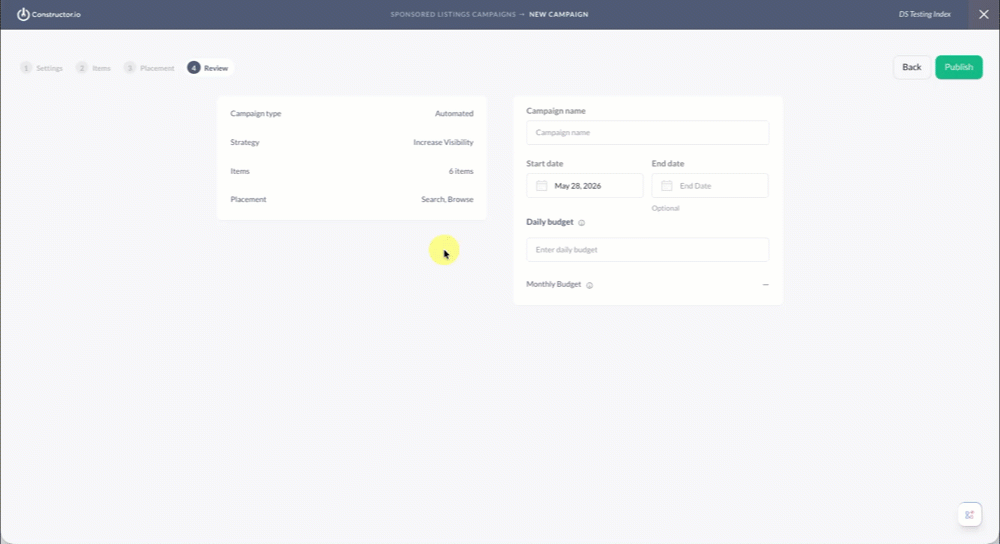
- Review campaign details listed on the left side of the page.
- Enter the Campaign name in the corresponding field on the right side of the page. This will help identify the campaign in the campaign listing.
- Choose a Start Date and End Date for the campaign. Selecting either date field expands a calendar picker, allowing you to select the desired date.
- The Start Date defaults to the current date, but you can change it to a future date if you are scheduling a future campaign.
- The End Date is optional but recommended for time-boxed campaigns.
- Enter your Daily budget in the field provided.
- The Total budget field below will adjust to reflect the total budget across the campaign dates you defined. If you are creating a campaign without a fixed end date, then you will see a Monthly budget.
- Select Publish in the top-right corner of the page to publish the sponsored campaign.
Updated about 1 month ago