Create a searchandising campaign
With a searchandising campaign, merchandisers can create a single set of rules and apply those rules across multiple contexts and across multiple indexes.
For example, say a home décor retailer is running a promotion for a sofa collection in multiple European markets. Rather than creating individual searchandising contexts for the queries sofa, three-seat sofa, chaise sofa, and the browse categories living room, sofas, and sectionals, the merchandiser can create a single campaign that includes all of those contexts.
The merchandiser can also select which indexes will contain this promotion. Since the target is European markets, this could include the retailer's France, Germany, and Spanish production indexes. Then the merchandiser can create a single set of searchandising rules that will apply to all of the selected contexts in each of the selected indexes.
Step 1: Select index(es) for the campaign
- Select Workspace in the side menu of the Constructor dashboard, then select Searchandising.
- Select + Add new rule in the top-right corner of the page.
- On the pop-up, select Create campaign.
- Select the Add multiple indexes to your campaign drop-down in the top-left corner of the page to select the indexes you wish to include in the campaign.
- Your current index will populate in this field.
- Don’t see the option to add additional indexes? Your permissions might restrict you from creating campaigns in other indexes. Please reach out to your internal admin for assistance.
- Select the checkbox to the left of each index you wish to add.
- Select Apply at the bottom of the list when you are finished selecting indexes.
- To remove an index, select the X to the right of the index name.
Step 2: Choose campaign contexts
In a campaign, context refers to the specific experience a user might choose when navigating a website. For example, entering a search query, browsing a category page, choosing to view items from a specific brand (facet page), or collection.
In this step, you’ll select the various contexts you wish to include in your campaign for each index you selected. This can be a mix of query, category, facet pages, or collections, or simply multiple queries, multiple category pages, multiple facet pages, or multiple collections.
View overall performance analyticsAs you select contexts, the analytics toward the top of the page will update. These are the overall performance analytics for the selected contexts over the last 30 days, designed to provide transparency into the page views, clicks, add-to-carts, purchases, and revenue you will influence with your strategy and rule(s).
- Select the + icon to the right of a context name (e.g., Queries, Categories, Facet, and Collection pages).
- At the top of the pop-up, you will see the current and additional indexes listed. A bold index name indicates the current index you are selecting options for while a green index number indicates an index with selected options.
- Choose the queries/categories/facets/collections you wish to add to the campaign for the selected index.
- ⚠️ Please note: When selecting contexts, there is a limit of 100 queries and 100 category and facet pages (combined) per index.
- Selected options appear at the bottom of the pop-up for review. Here you also have the option to select the Add these entries to all indexes.
- If you select this option, Constructor will match options across indexes using the search query term and category/facet/collection IDs.
- Select Go to next index in the bottom-right corner of the pop-up.
- If making edits to an index’s options, you can select Apply changes to apply change and exit the pop-up.
- Repeat steps 3-4 for each index included in the campaign, as needed.
- Once done, select Save all selected entries.
- Once you have selected options for the desired contexts across your selected indexes, you can proceed. Select Continue to step 2 in the top-right corner of the page.
Select all
Rather than select individual queries, categories, collections, and facet pages, you now have the option to Select all. For example, if you wish to searchandise on queries that contain a specific term. Search for the term, then choose Select all.
For categories, Select all will only select the categories currently visible in the results returned for the term you entered. Look at the example below for the Sweaters & Sweatshirts category (category #1112):
Initially, only one category appears for Select all: the Sweaters & Sweatshirts category. If a retailer were to select this single category and create a boost rule, that rule would only be applied to items on the Sweaters & Sweatshirts category. The boost rule would not be applied to any of the subcategories within this category.
However, if the retailer selects the Show subcategories toggle, then those subcategories appear (e.g., Sweatshirts & Fleece, Half & Full Zip Sweaters, etc.). Now that these categories are visible, they are included in the Select all action. If the retailer were to select all, then the boost rule they create would apply to the results page for every subcategory within the Sweaters & Sweatshirts category.
Show subcategories
For categories, you can choose to enable the Show subcategories toggle at the top of the listing to show additional subcategories within top-level categories. This allows you to be more granular with your searchandising, if desired.
For example, a retailer is running a promotion on men’s scarves for the holiday season. Scarves is a subcategory of Accessories. The retailer does not want to boost or slot scarves into the broader category of Accessories because they do not want to impact the visibility of other accessories, like belts and ties. In this situation, they can enable the Show subcategories toggle and select the Scarves subcategory to include it in their campaign.
Alternatively, if the retailer wanted to boost a specific brand across the entire Accessories category (including sub-categories), they could select Show subcategories then choose Select all to include every Accessories sub-category in the campaign.
Edit contexts
To make changes to any of the selections in a context, select the pencil icon in the top-right corner of the context list. This will launch the selection pop-up. Selections appear at the bottom of the pop-up. Select the X to the left of the selection to remove it, then select Add.
Step 3: Assign a user segment (optional)
You have the option to assign a user segment at this level. Doing so will automatically assign the user segment to any rules you create within the campaign, saving you and your team from having to manually add the segment to each rule. Available segments include geo-based segments, segments provided using the us parameter, and AI-generated segments (e.g., RFM, Affinity, etc.).
- Select Set User Segment in the top-right corner of the page.
- On the pop-up, select your desired segment.
- Use the search field to search for the segment by name.
- Select any of the segment categories (e.g., Affinity, RFM, Location, etc.) to view available segments.
- Note: Analytics for a segment reflect the behavior of the users included in the individual segment over the last 30 days.
- Select Continue in the bottom-right corner of the pop-up.
- Once done, select Continue to step 2 in the top-right corner of the page.
Step 4: Enter campaign details
-
Enter details for your campaign in the fields provided:
- What are you promoting today? In this field, enter a name for your campaign. This will help you identify the campaign from others in the main Campaigns listing.
- What promotional goals are you aiming for? In this field, share promotional strategy with your team so others viewing the campaign in the listing can understand the intent of the campaign.
-
If you need to make edits to your campaign contexts, select Back to step 1.
-
Select Start searchandising in the top-right corner of the page.
Step 5: Add rules
On the following page, you can create the rules you wish to apply to the various contexts selected for the campaign.
Boost and bury rules
With boost and bury rules, you can boost or bury specific items or item attributes across all of the selected contexts. If boosting, this will help increase the ranking score of corresponding items, whereas burying will decrease the ranking score of those items.
The extent to which items are boosted or buried will vary by context as Constructor’s ranking algorithm calculates item ranking scores as a user views results for that context. For example, a boosted polo shirt might appear in the #3 position for the polo shirts query but in the #5 position for the Tees and Polo category. This is because other ranking and personalization factors are being considered for the user viewing the results. However, in both contexts, the polo is being boosted by the specified strength level.
Slotting rules
With slotting rules, you can slot an item into a specific position across all of the selected contexts. For example, a blue cotton polo shirt slotted into position #2 will show in that position for all queries, category pages, and facet pages included in the campaign.
Another option is to slot by item attribute. For example, a retailer can slot a specific category into position #2 and Constructor will display the most attractive item from that category for the user performing the search or viewing the category or facet page.
Step 6: Save a campaign
When you are ready to save the campaign, select Save Campaign in the top-right corner of the page.
On a pop-up, Constructor will display the progress of saving the campaign rules to each index. If any errors appear, you will see details here and be given the opportunity to resolve the errors.
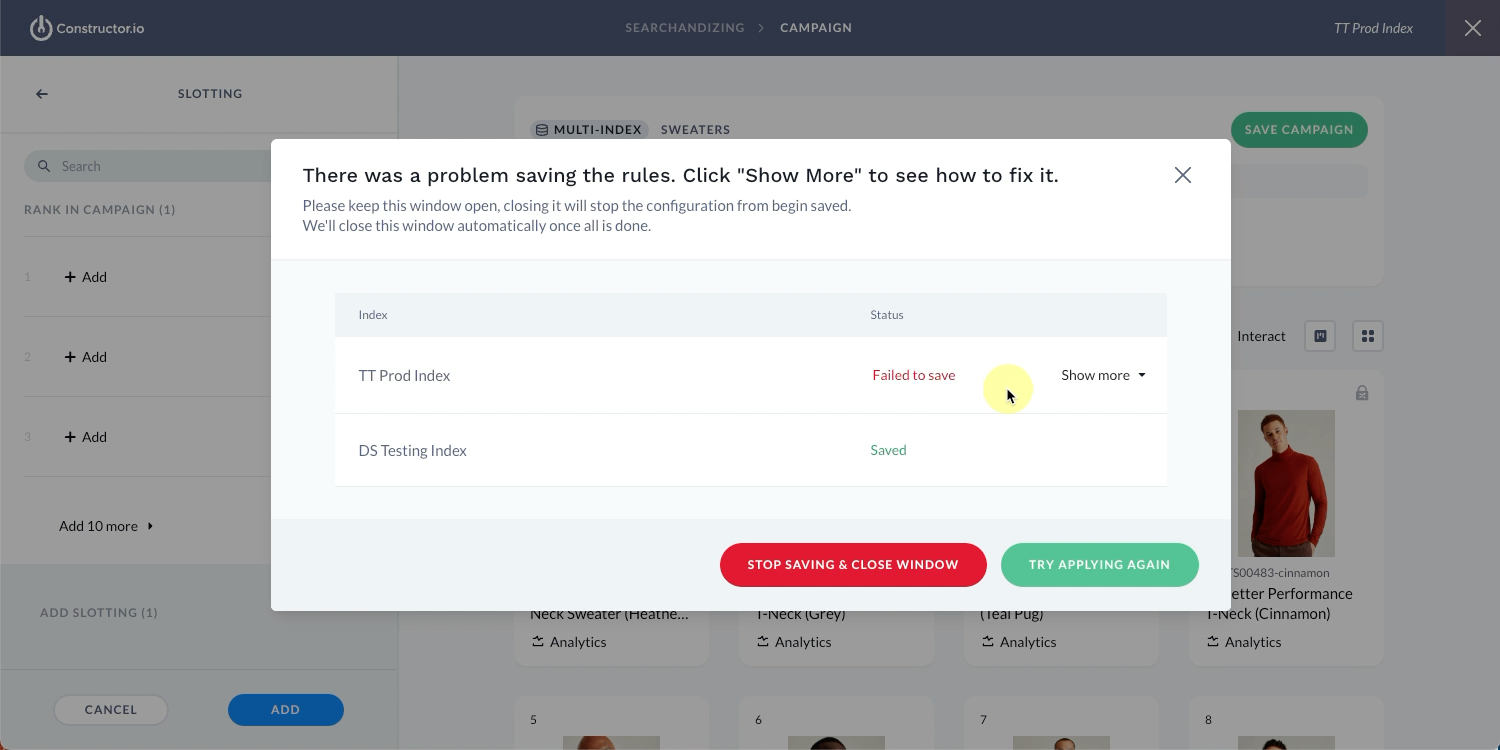
Resolve slotting errors
Campaign errors pertain to slotting rules. For example, you chose to slot an item or item attribute into position #4, but a category page included in the campaign in the Prod index has an existing slotting rule for the same position. Since a campaign will not overwrite this rule, you will need to resolve it.
- Select Show more for the flagged index to view a list of errors.
- Review the error description to pinpoint the source of the conflict.
- Select Resolve to the far right of an error to open the specific
index + contextpage in a new tab. For example, selecting Resolve for a slotting error flagged on thesweaterscategory page in theProdindex will open thesweaterscategory page in theProdindex so you can resolve the issue. - Resolve the issue by either removing the slotting rule or changing the slotted position.
- Repeat this for all flagged errors, then select Try applying again to apply the campaign rules to the flagged index.
Resolve errors with partially applied rules
Partially applied rules occur when a user selects Stop saving & close window while saving a campaign, resulting in Constructor applying the rules to some but not all included indexes.
Here, a merchandiser has two options:
- Delete the rule: If a merchandiser wishes to remove the rule from the campaign, they can simply delete it by selecting the trashcan icon.
- Save the campaign: If a merchandiser wishes to continue saving the campaign rules to remaining indexes, they can select Save campaign in the top-right corner to continue saving. Once Constructor saves the rule to all campaigns, the error will disappear.
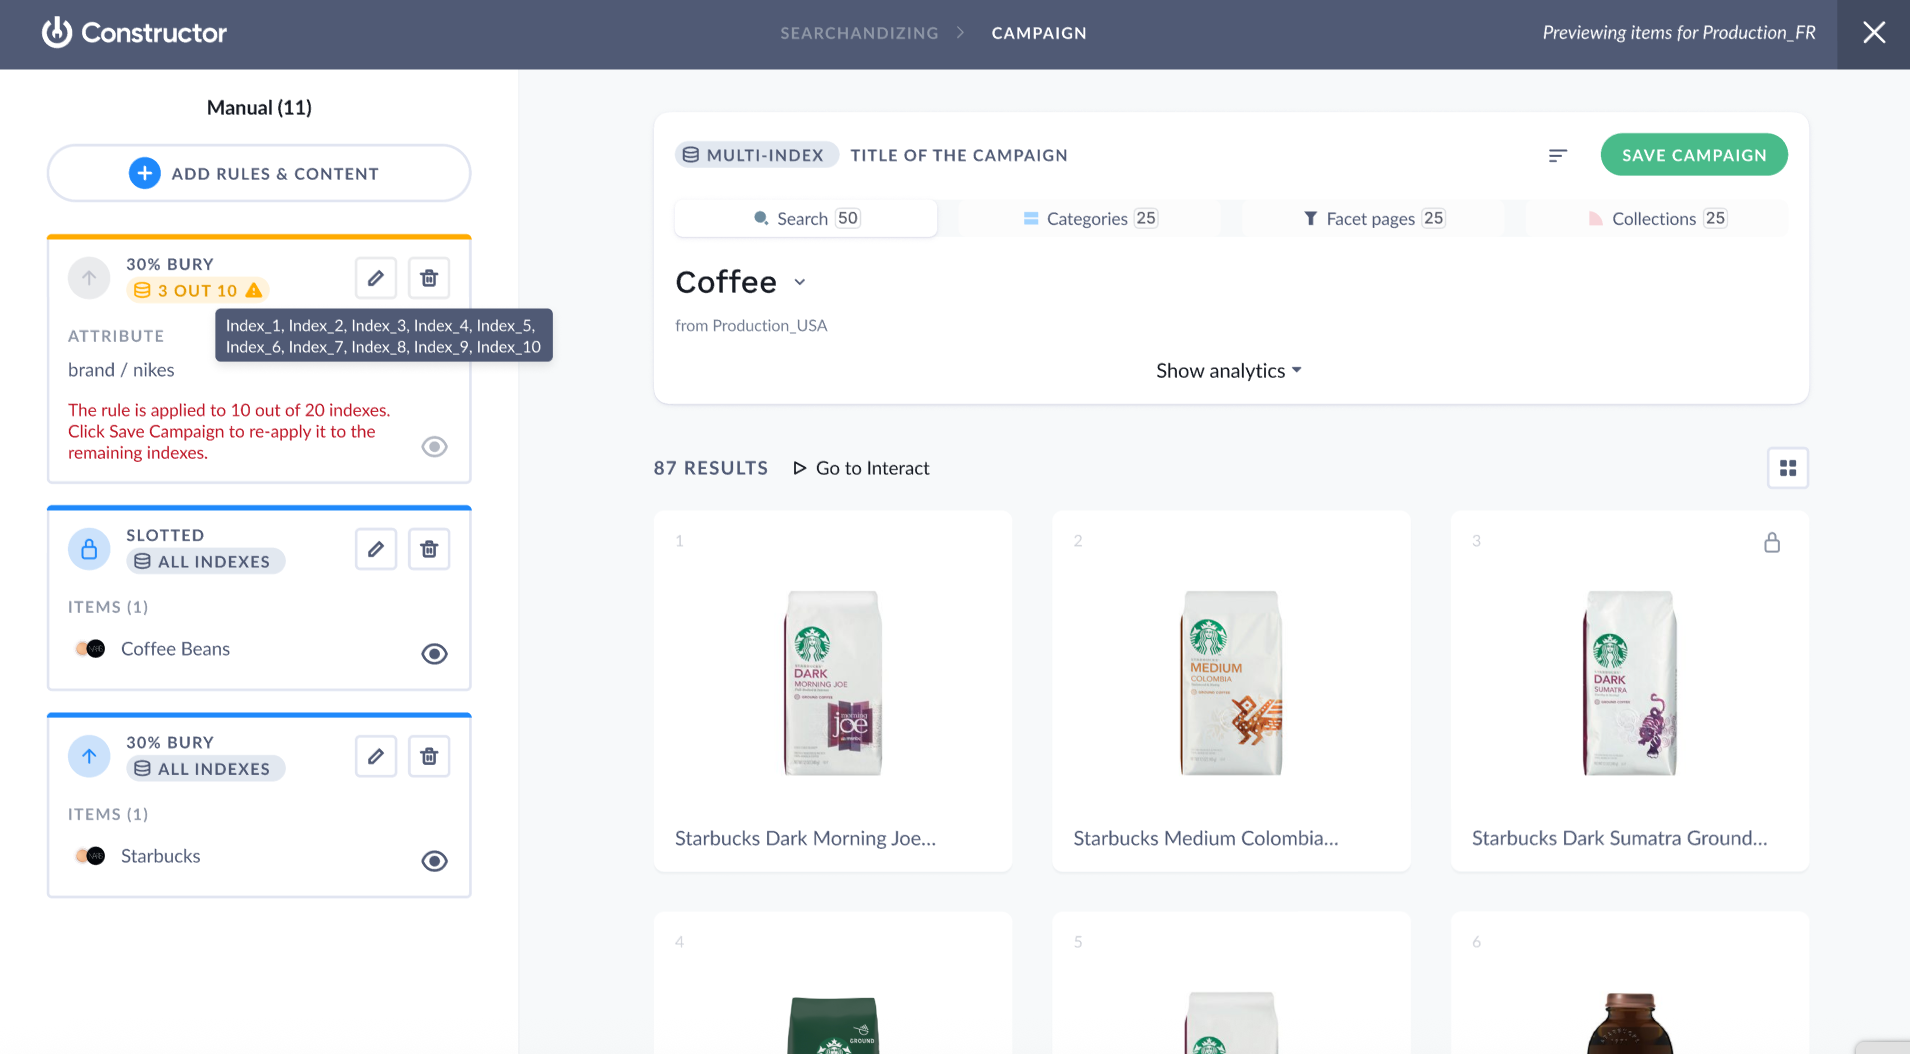
View item ranking on specific results pages
You can quickly jump to any results page included in your campaign to view how the rules you’ve created impact the items on those results pages. Keep in mind that these results are specific to the context you’re viewing in the index you selected.
If you applied a segment at the campaign-level, then that segment is automatically assigned to results page(s). You can always remove this segment from the view by selecting the X to the right of the segment.
View performance analyticsAs you view specific results pages, or contexts, you can view analytics for the specific pages by selecting the Show analytics drop-down option. These analytics reflect the last 30 days and are designed to provide transparency into the page views, clicks, add-to-carts, purchases, and revenue you will influence with your strategy and rule(s).
- Locate and select the context you wish to view (e.g., Queries, Categories, Facets, and Collections) at the top of the page.
- Next, locate the results page drop-down in the top-left corner of the results page.
- Select the drop-down to choose a different option (e.g., query, category, etc.) from the list.
- Select the desired index from the options listed.
- Once selected, the page will refresh to show how the campaign rules will impact results for users viewing the specific results page for that selected index.
- To view how segment-specific rules impact results for users in that segment, select Impersonate and select the correct segment.
Updated 7 months ago