Create a facet campaign
With facet campaigns, merchandisers can apply a single set of rules—such as slotting or blocklisting a facet group and/or option—to multiple results pages simultaneously. This delivers a consistent filtering experience between a set of browse category pages, browse category sub-pages (e.g., Denim > Straight Leg), and related search queries and collections.
It is also an easy way to keep filtering experiences tidy by hiding facet groups that are only relevant to a small subset of items on the page. For example, for a specific retailer, the facet heel height is only relevant for women’s shoes and boots. In a campaign that includes the Shoes and Athletic Shoes categories and Kid’s Summer Shoes collection, a retailer might choose to hide this facet as it doesn’t apply to the sneakers, flats, and sandals in those categories. This creates less clutter and filters to scroll through in the side menu.
Create a facet merchandising campaign
When creating a facet merchandising campaign, you will first select which results pages to include in the campaign, then define the slotting or hiding rules you wish to apply to the facets on those pages.
Step 1: Choose contexts
Context refers to the results page experiences where you wish to apply facet rules. In a campaign, this can be a combination of search results pages, browse category pages, collections, and facet pages.
- Select Workspace in the side menu of the Constructor dashboard, then select Facets.
- Select + Add new rule.
- On the pop-up, select Create a facet rule campaign.
- On the following page, add queries, categories, collections, and/or facets pages by selecting the + icon for the corresponding context.
- For each context, choose the queries, categories, collections, and/or facet pages to add to the campaign, then select Add in the bottom-right corner of the pop-up.
- Once you have selected all relevant contexts, select Continue to Step 2 in the top-right corner of the page.
⚠️ Please note: When selecting contexts, there is a limit of 100 queries and 100 category, facet pages, and collections (combined).
Step 2: Enter campaign details
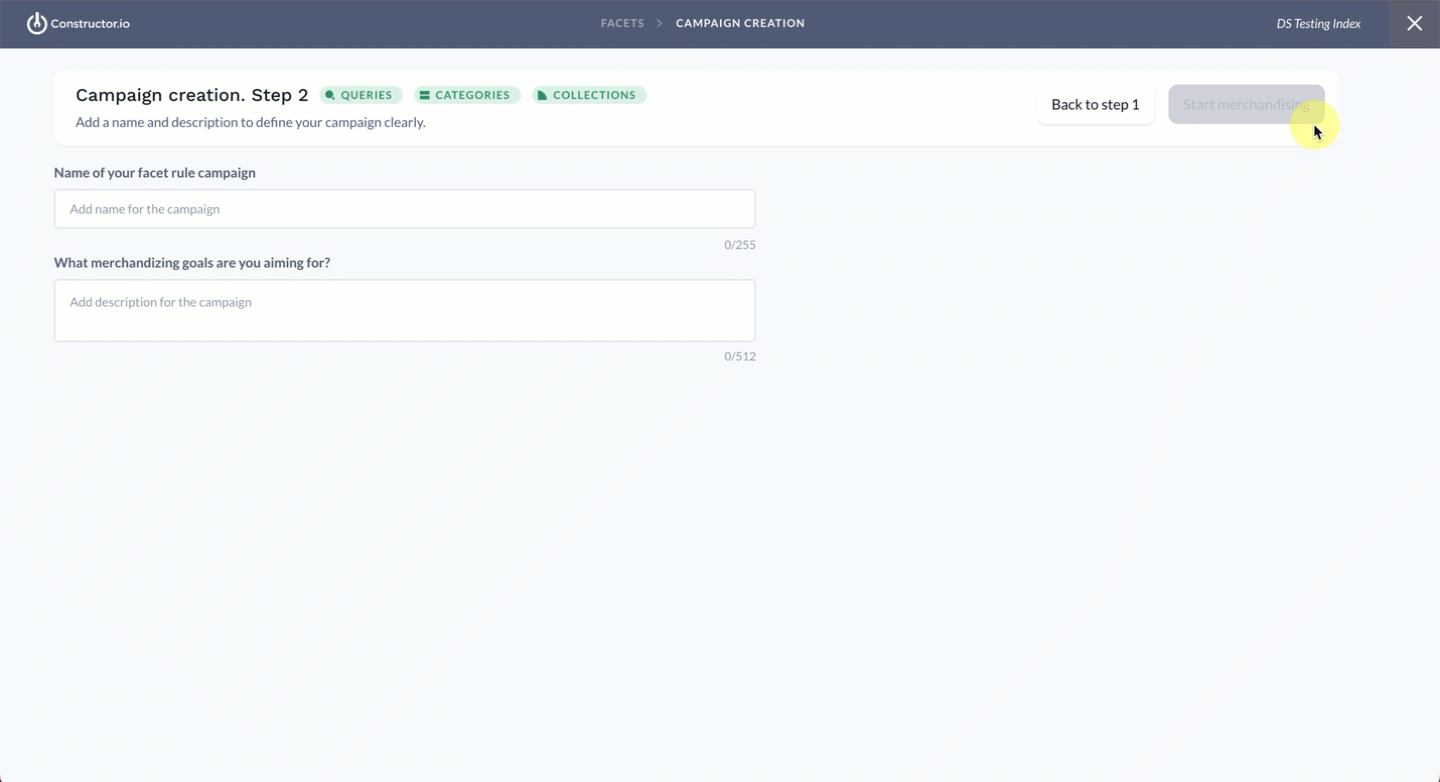
- Enter details for your campaign in the fields provided:
- Name of your facet campaign: In this field, enter a name for your campaign. This will help you identify the campaign from others in the main campaign rules listing.
- What merchandising goals are you aiming for? In this field, share your promotional strategy with your team so others viewing the campaign in the listing can understand the intent of the campaign.
- If you need to make edits to your campaign contexts, select Back to step 1.
- Select Start merchandising in the top-right corner of the page.
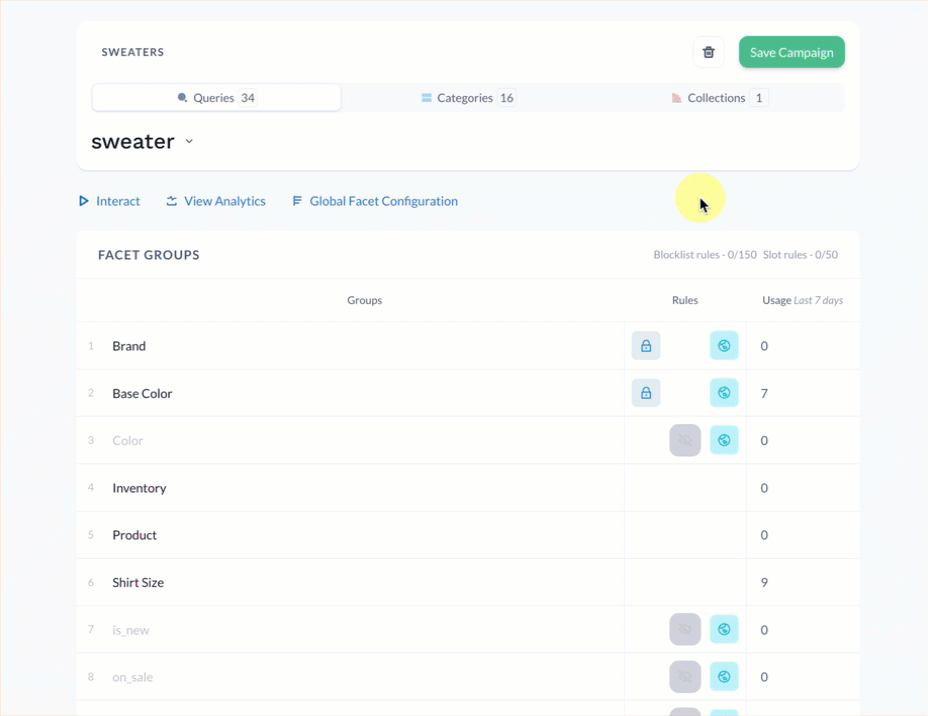
Step 3: Define facet order and visibility
On this page, you can dictate the order in which facets appear on the left side of the results page for the specific search query, browse category, or collection page you selected.
Slot a facet group in a specific position
When slotting a facet group in a specific position, you are doing so for every context (e.g., search results page, category pages, etc.) included in the campaign.
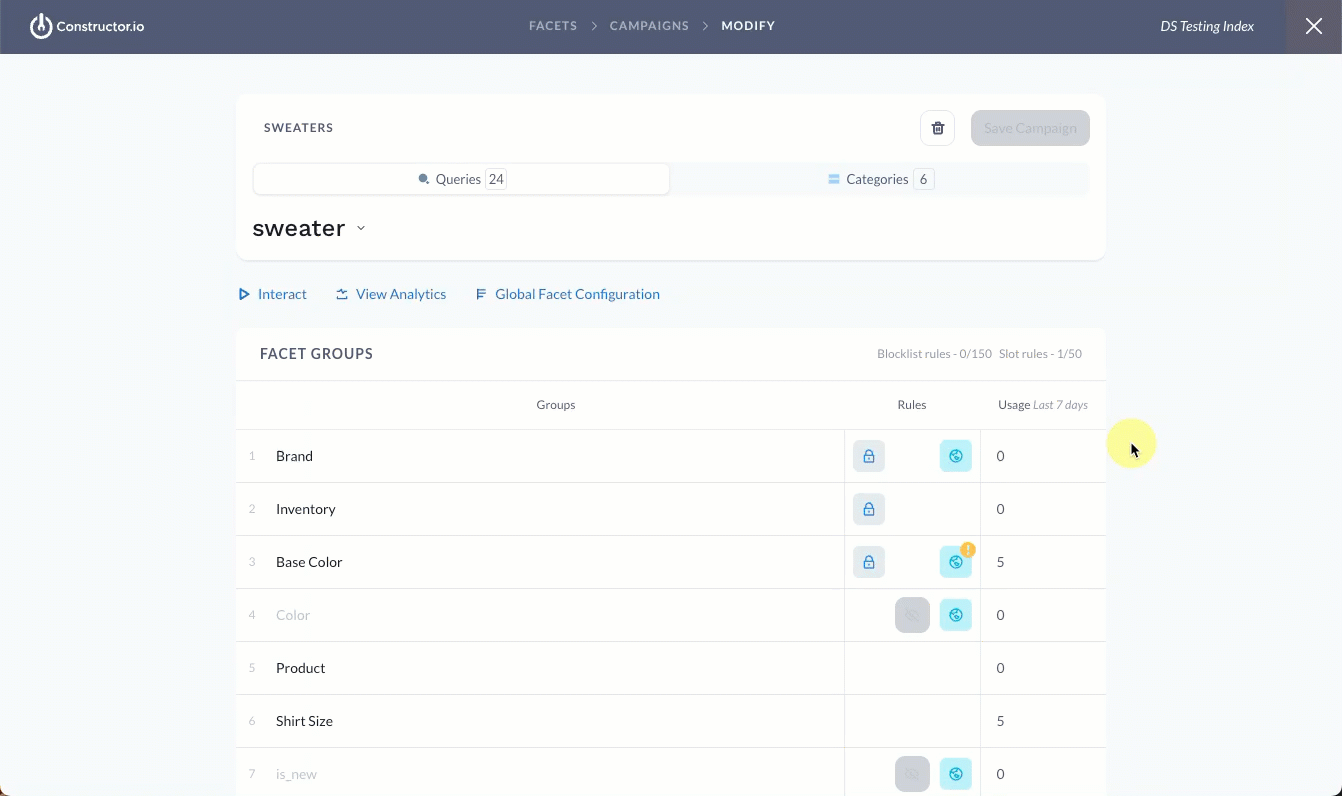
- Hover over the desired facet group.
- Locate and select the up/down arrows located in the Rules column for that row.
- Select Move to position.
- Enter the new position in the field provided.
- Select the green checkmark.
- Alternatively, you can drag and drop a group into the desired position. The position details will update automatically.
Slotted facet groups will appear in their assigned position on all results pages included in the campaign. All other facets will be dynamically ordered by Constructor’s facet group sorting algorithm.
A note on existing locked positionsAn existing lock icon indicates that a facet’s position was previously specified, either on a global level, in another campaign, or using a single context facet rule. You can still change the position by either drag and dropping the locked facet or selecting the lock icon and following the steps outlined above.
Learn more about the icons displayed in the Rules column here.
Hide a facet group
When hiding a facet group in a specific position, you are doing so for every context (e.g., search results page, category pages, etc.) included in the campaign.
- Hover over the desired facet group.
- Locate and select the eye icon located in the Rules column for that row. Once hidden, the eye icon displays a line through it.
- To make a hidden facet group visible again, select the eye icon with a line through it.
Step 3: Define facet option order and visibility (optional)
In addition to dictating the order of facet groups, you can also define the order for options within that group. For example, a beauty retailer can position their own brand at the top of the brand facet for better visibility.
When ordering or hiding facet options within a face group, you are doing so for every context (e.g., search results page, category pages, etc.) included in the campaign.
- Hover over the desired facet group.
- Select View Options.
- To move a facet option, hover over the option and select the up/down arrows located in the Rules column for that option.
- Select Move to position.
- Enter the new position in the field provided.
- Select the green checkmark.
- Alternatively, you can drag and drop the option to the desired position.
- To hide a facet option, hover over the option and select the eye icon located in the Rules column.
- Select the facet group name in the top-left corner of the list to navigate back to the list of facet groups.
Step 4: Save campaign
Once you have defined the preferred order or hidden desired facet groups and options, select Save Campaign in the top-right corner of the page.
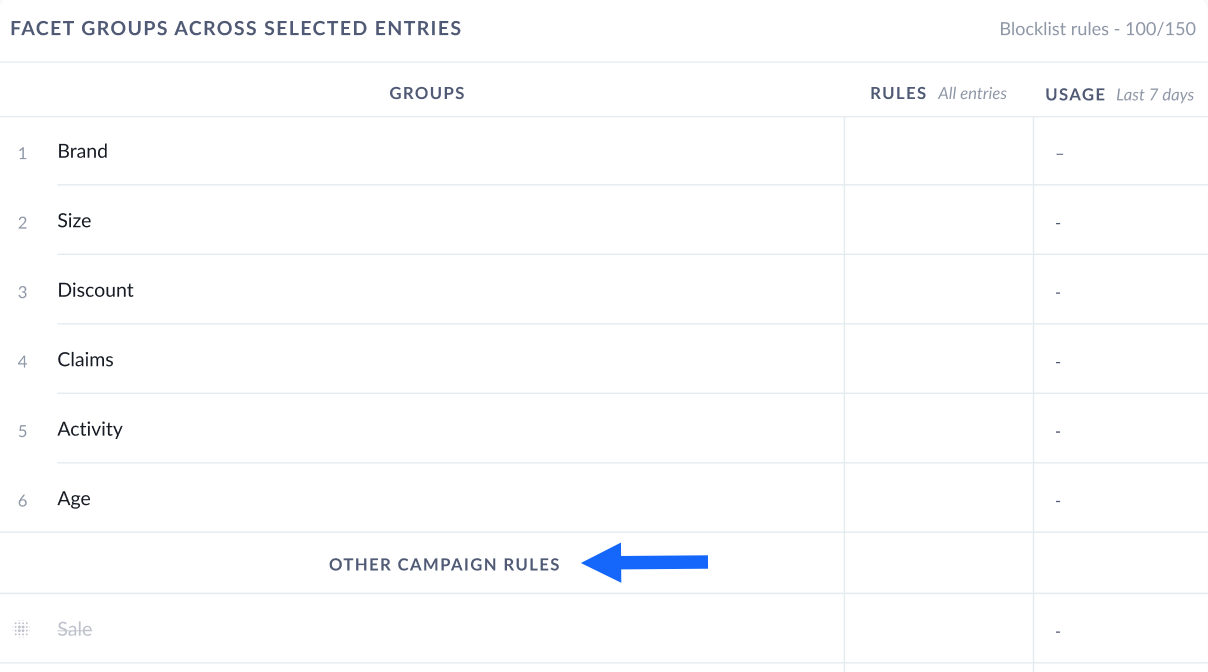
Review other campaign rules
Results pages can display different facets depending on the items displayed. With a campaign, this means that some facets may appear on some of the results pages you have included in the campaign, but not on all of them.
For example, a grocer has a sale facet defined for ground coffee but not whole bean. If the campaign includes the browse page Coffee and the search query results pages for “whole bean coffee” and “ground coffee”, then the sale facet would appear on the Coffee browse page and the search results page for “ground coffee.”
When a merchandiser creates a rule for a facet like sale, Constructor will still display the facet on the facet rule configuration page for contexts where the facet doesn’t appear so that the merchandiser is aware the rule exists elsewhere in the campaign.
For example, the screenshot below is the rule configuration page for the search query “whole bean coffee.” Elsewhere in the campaign, the merchandiser has slotted the sale facet in the first position. Since that facet isn’t defined for items on this page, it does not appear in this position. However, Constructor wishes to keep the merchandiser aware of the rule for this facet, and so the facet appears grayed out under Other Campaign Rules.
Review overlapping rules
When creating facet rules, you may encounter different notifications in the Rules column. These occur when facet rules overlap on the global level, in another existing campaign, or in a single-context results page. For example, a global rule and campaign slot different facets in the #2 position.
It is important to note that when rules overlap, you can still proceed with saving the rule(s) you are creating. However, it is essential to understand how this will impact the facet order on the affected results pages.
Constructor prioritizes facet rules when overlaps occur. For example, a retailer has a global facet rule that slots the brand facet in the first position across their website. However, a merchandiser wants to create a set of rules for a facet campaign that will slot the sale facet in the first position across the browse and search results pages included in the campaign.
Similarly, overlaps can apply to the treatment of a facet group in different levels (i.e., global vs. campaign). For example, a retailer has a global rule that slots the brand facet in the first position across a website. However, for a specific campaign, a merchandiser wants to slot the brand facet in the third position.
In both of these scenarios, the campaign rules would take priority over the global rule on the pages included in the campaign.
However, if the conflicting rule is for a page you have included in the campaign that also has a single-context rule defined for it, then the single-context rule takes priority. For example, the beauty retailer creates a campaign rule that slots the sale facet in the first position. Included in that campaign is the Viral Hits collection. However, this collection has a separate rule created just for that page that slots the ratings facet in the first position. In this scenario, the single-context rule would take priority for that page. This means the sale facet would show in the first position for all results pages included in the campaign, except the Viral Hits collection, where ratings would appear in the first position.
Learn more about facet rule prioritization here.