Installing the Constructor Connect Cartridge for B2C Commerce
Requirements
The first step is to obtain the source code for the cartridge. It can be downloaded through the official Salesforce AppExchange Listing. When selecting a version to download, please pay attention to which major version you need according to your setup (Site Genesis or SFRA).
For assistance with the installation process, please contact our team at [email protected]. A Constructor engineer will gladly guide you through the installation steps beyond what is covered in this document.
A note on SFRA installationsIf you're installing the frontend (SFRA) cartridge, it's also required to locally have the Storefront Reference Architecture source code. You can always get a fresh copy following the official Salesforce guide.
Step 1: setting up your environment
First, unzip the source code file, and create a dw.json file in the root directory with your credentials:
{
  "username": "your_salesforce_username",
  "password": "your_salesforce_password",
  "hostname": "your_salesforce_hostname",
  "version": "optionally_your_salesforce_code_version"
}
Setting up the storefront reference architecture base path
NoteThis step is only required if you're installing the frontend cartridge on SFRA, to leverage UI components.
It is important to update the local relative path to the app_storefront_base source code located in the package.json file.
{
  "paths": {
    "base": "../storefront-reference-architecture/cartridges/app_storefront_base/"
  }
}
The default path assumes the cartridge folder is on the same level as the Reference Architecture source code:
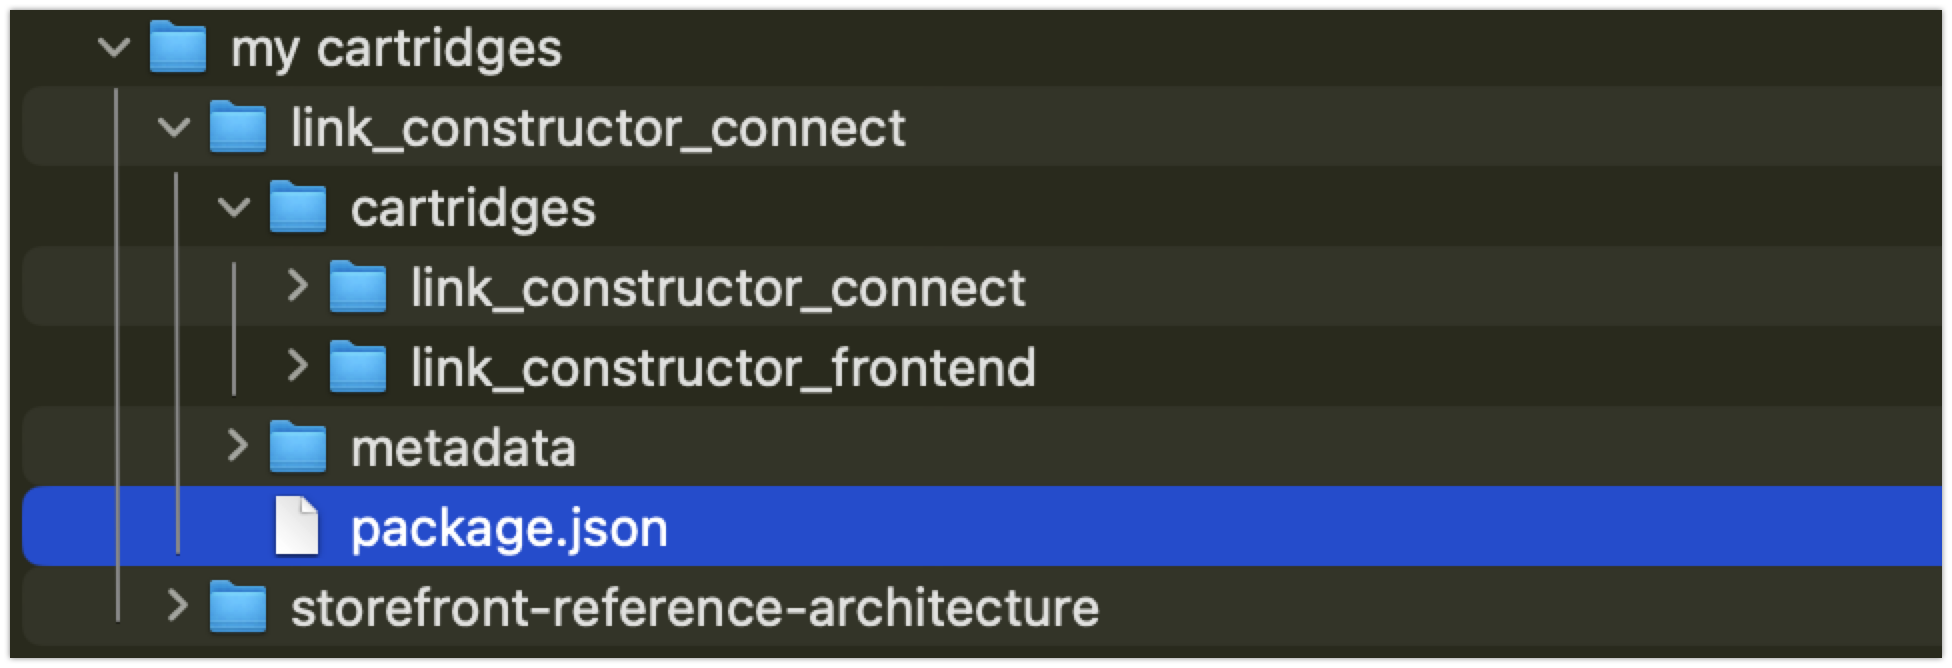
Cartridge folder structure
Step 2: uploading the cartridge
There are a couple of ways to upload the cartridge source code to Salesforce. The simplest way is to use to provided scripts on the repository:
npm install
npm run uploadCartridge
Alternatively, you can look into other tools such as the Prophet Debugger. Those tools often provide you with the capability of automating the upload and keeping the code up to date as you develop.
For more information, please refer to the official documentation: Upload and Configure Cartridges.
Step 3: cartridge metadata installation & setup
After installing the cartridge, the cartridge metadata should be updated to ensure the services, site preferences and jobs are correctly created.
To do this, find the metadata/link_constructor_connect.zip file in the source code and go to
Administration > Site Development > Site Import & Export.
There, the file will need to be uploaded and imported:
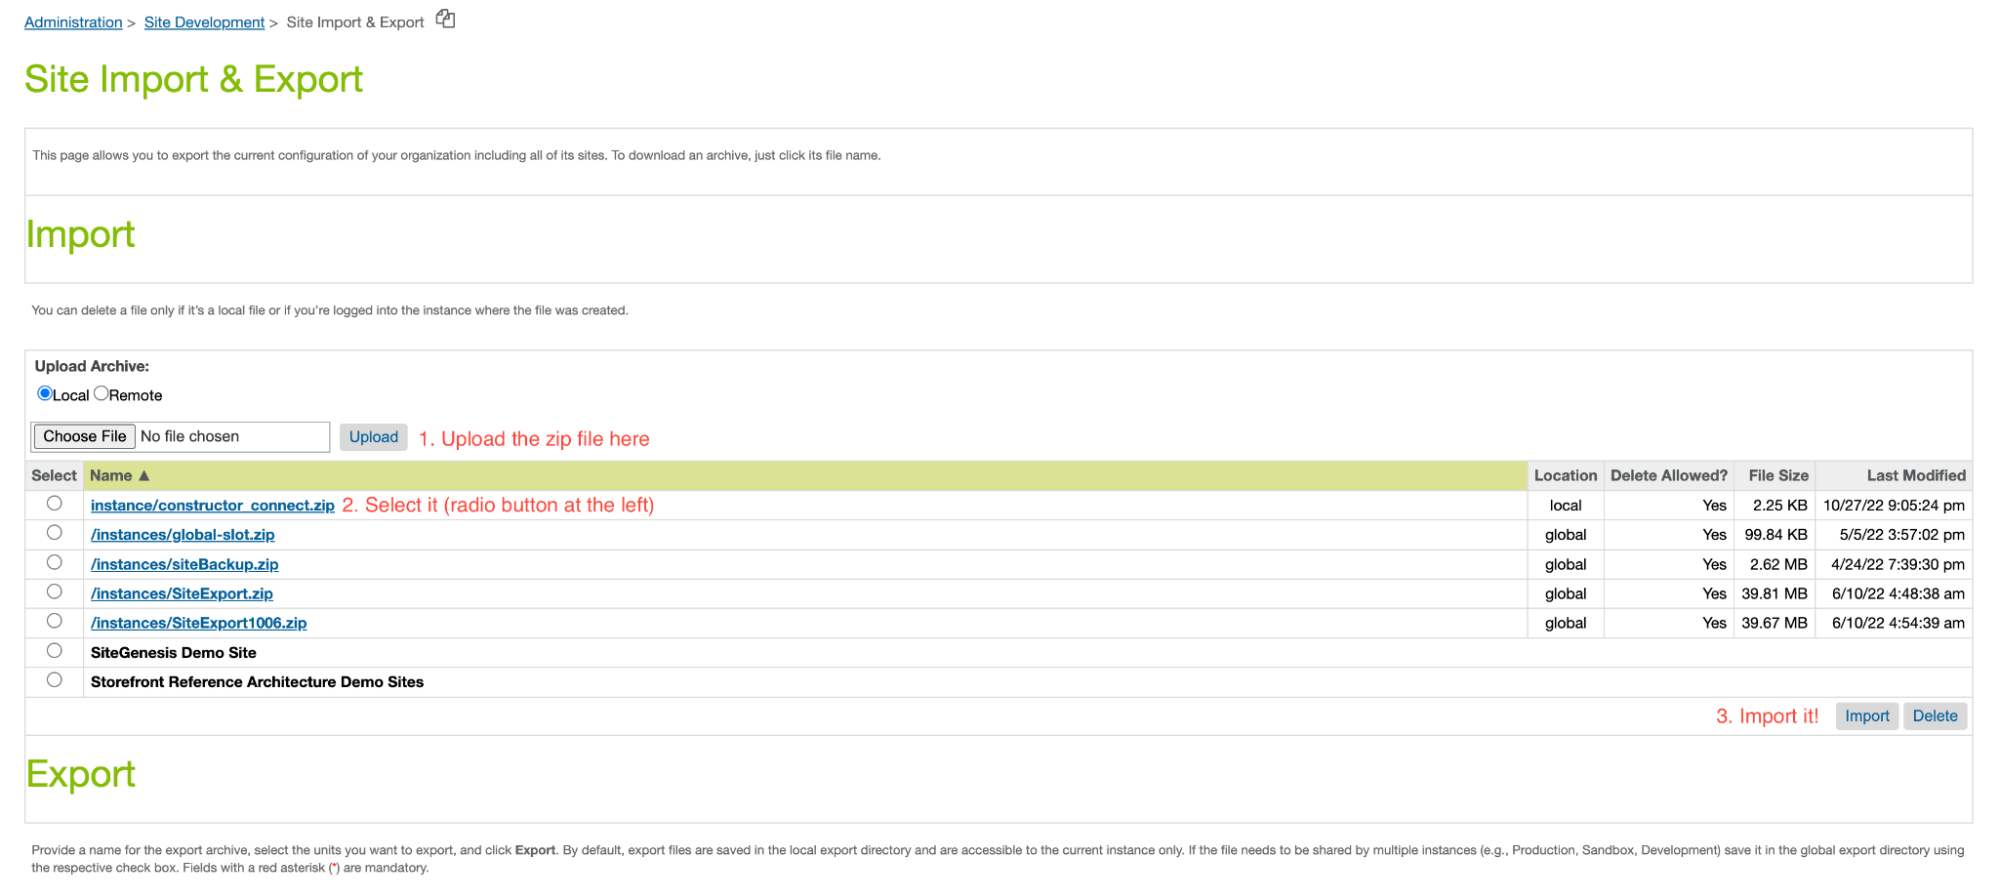
Uploading and importing cartridge through administration
Step 4: fill your credentials
After uploading the cartridge and importing the metadata zip file, you'll need to fill up your Constructor credentials in Salesforce.
Go to Merchant Tools > Site Preferences > Custom Site Preference Groups and find the Constructor group:

Constructor group within custom site preference groups
There, you'll want to fill in your Salesforce Token and Index Key for each site that will be powered by the cartridge:
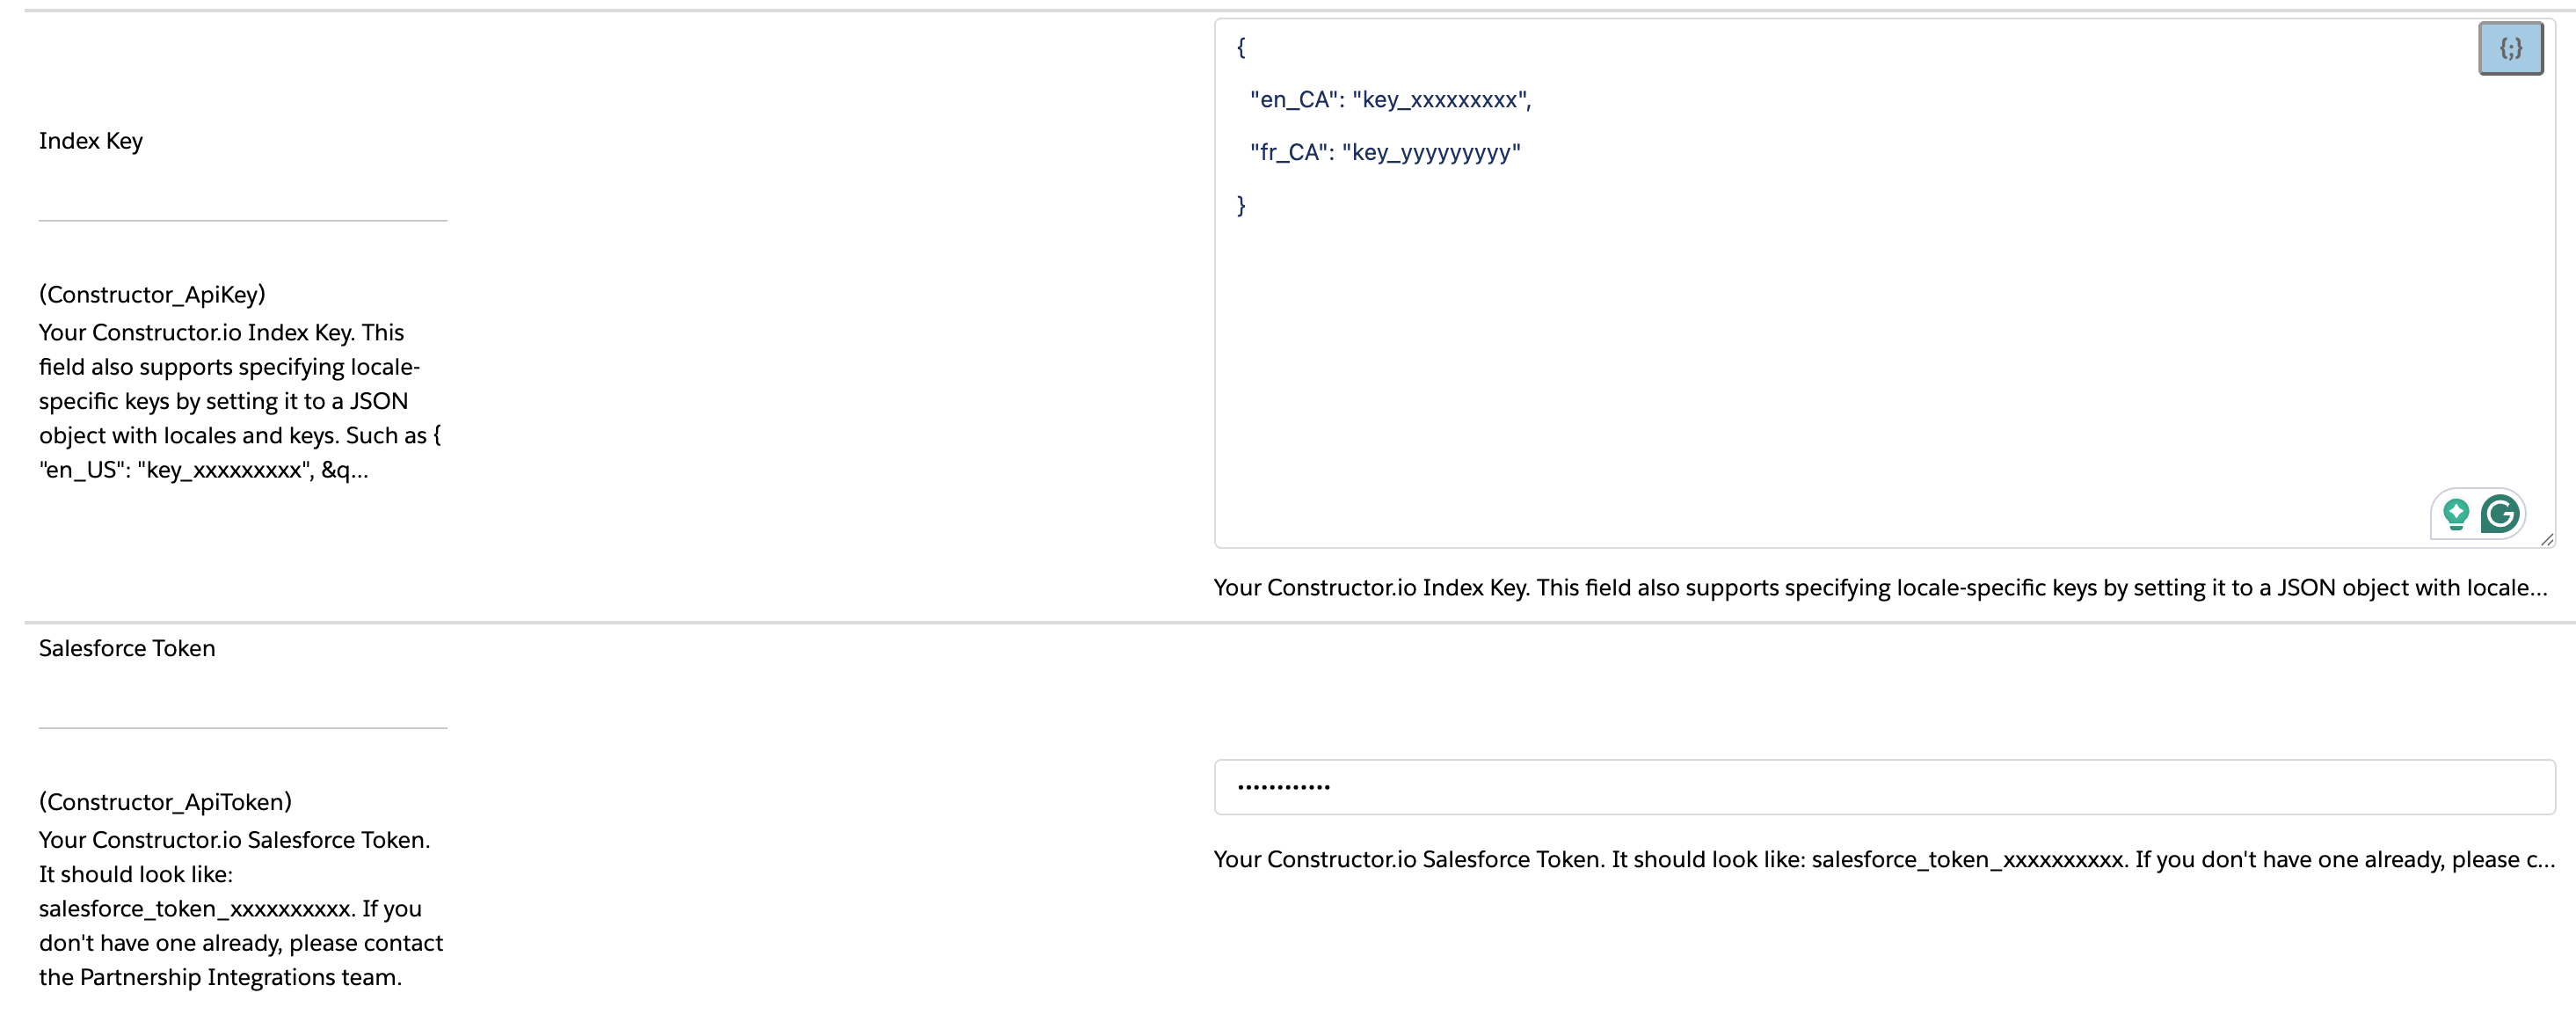
Editing Constructor group to supply Salesforce Token and locale-specific index keys
If the site you're setting up doesn't have multiple locales, you can simply set the Index Key value as a string:

Setting up a standalone Index Key
Step 5: adding all cartridges to the path
Additionally, to enable all cartridges to support overlaying your custom code changes, you'll need to update your instance's cartridge path as follows:
Using the Demandware With Ease extension
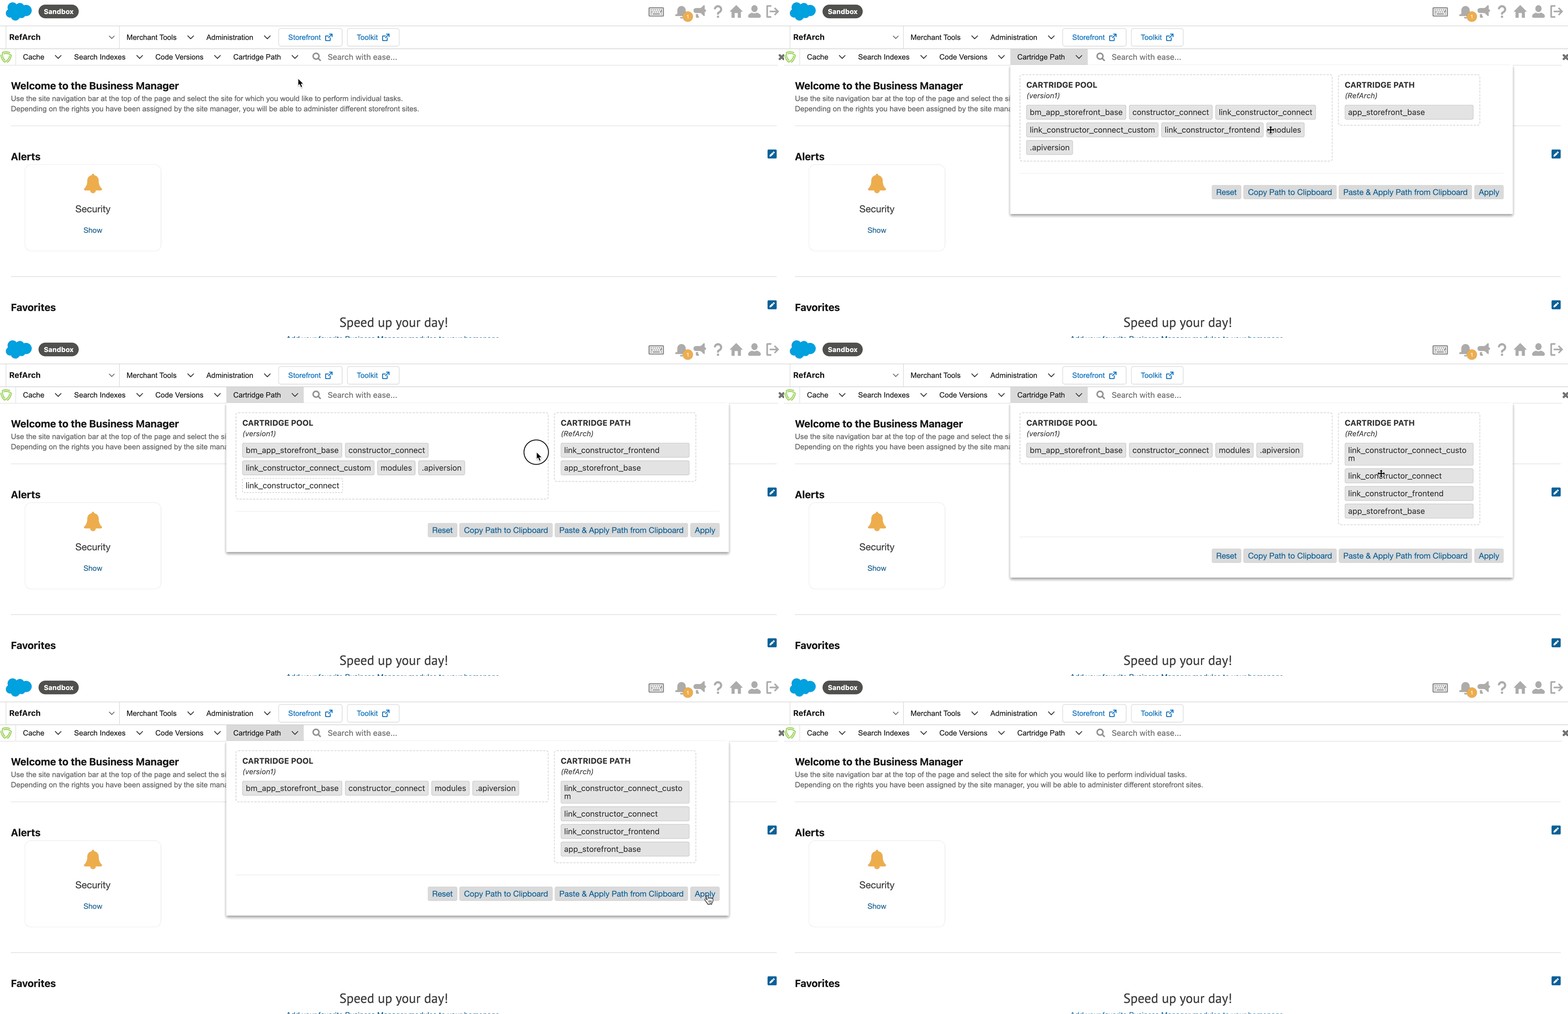
Updating via Demandware With Ease
Manually updating
To manually update, access Administration > Sites > Manage Sites >] > Setting > Settings and add all cartridge names as a prefix to app_storefront_base (or sitegenesis_storefront_controllers, in case you're using Site Genesis).
For example, another_cartridge:app_storefront_base would become another-cartridge:link_constructor_frontend:app_storefront_base.
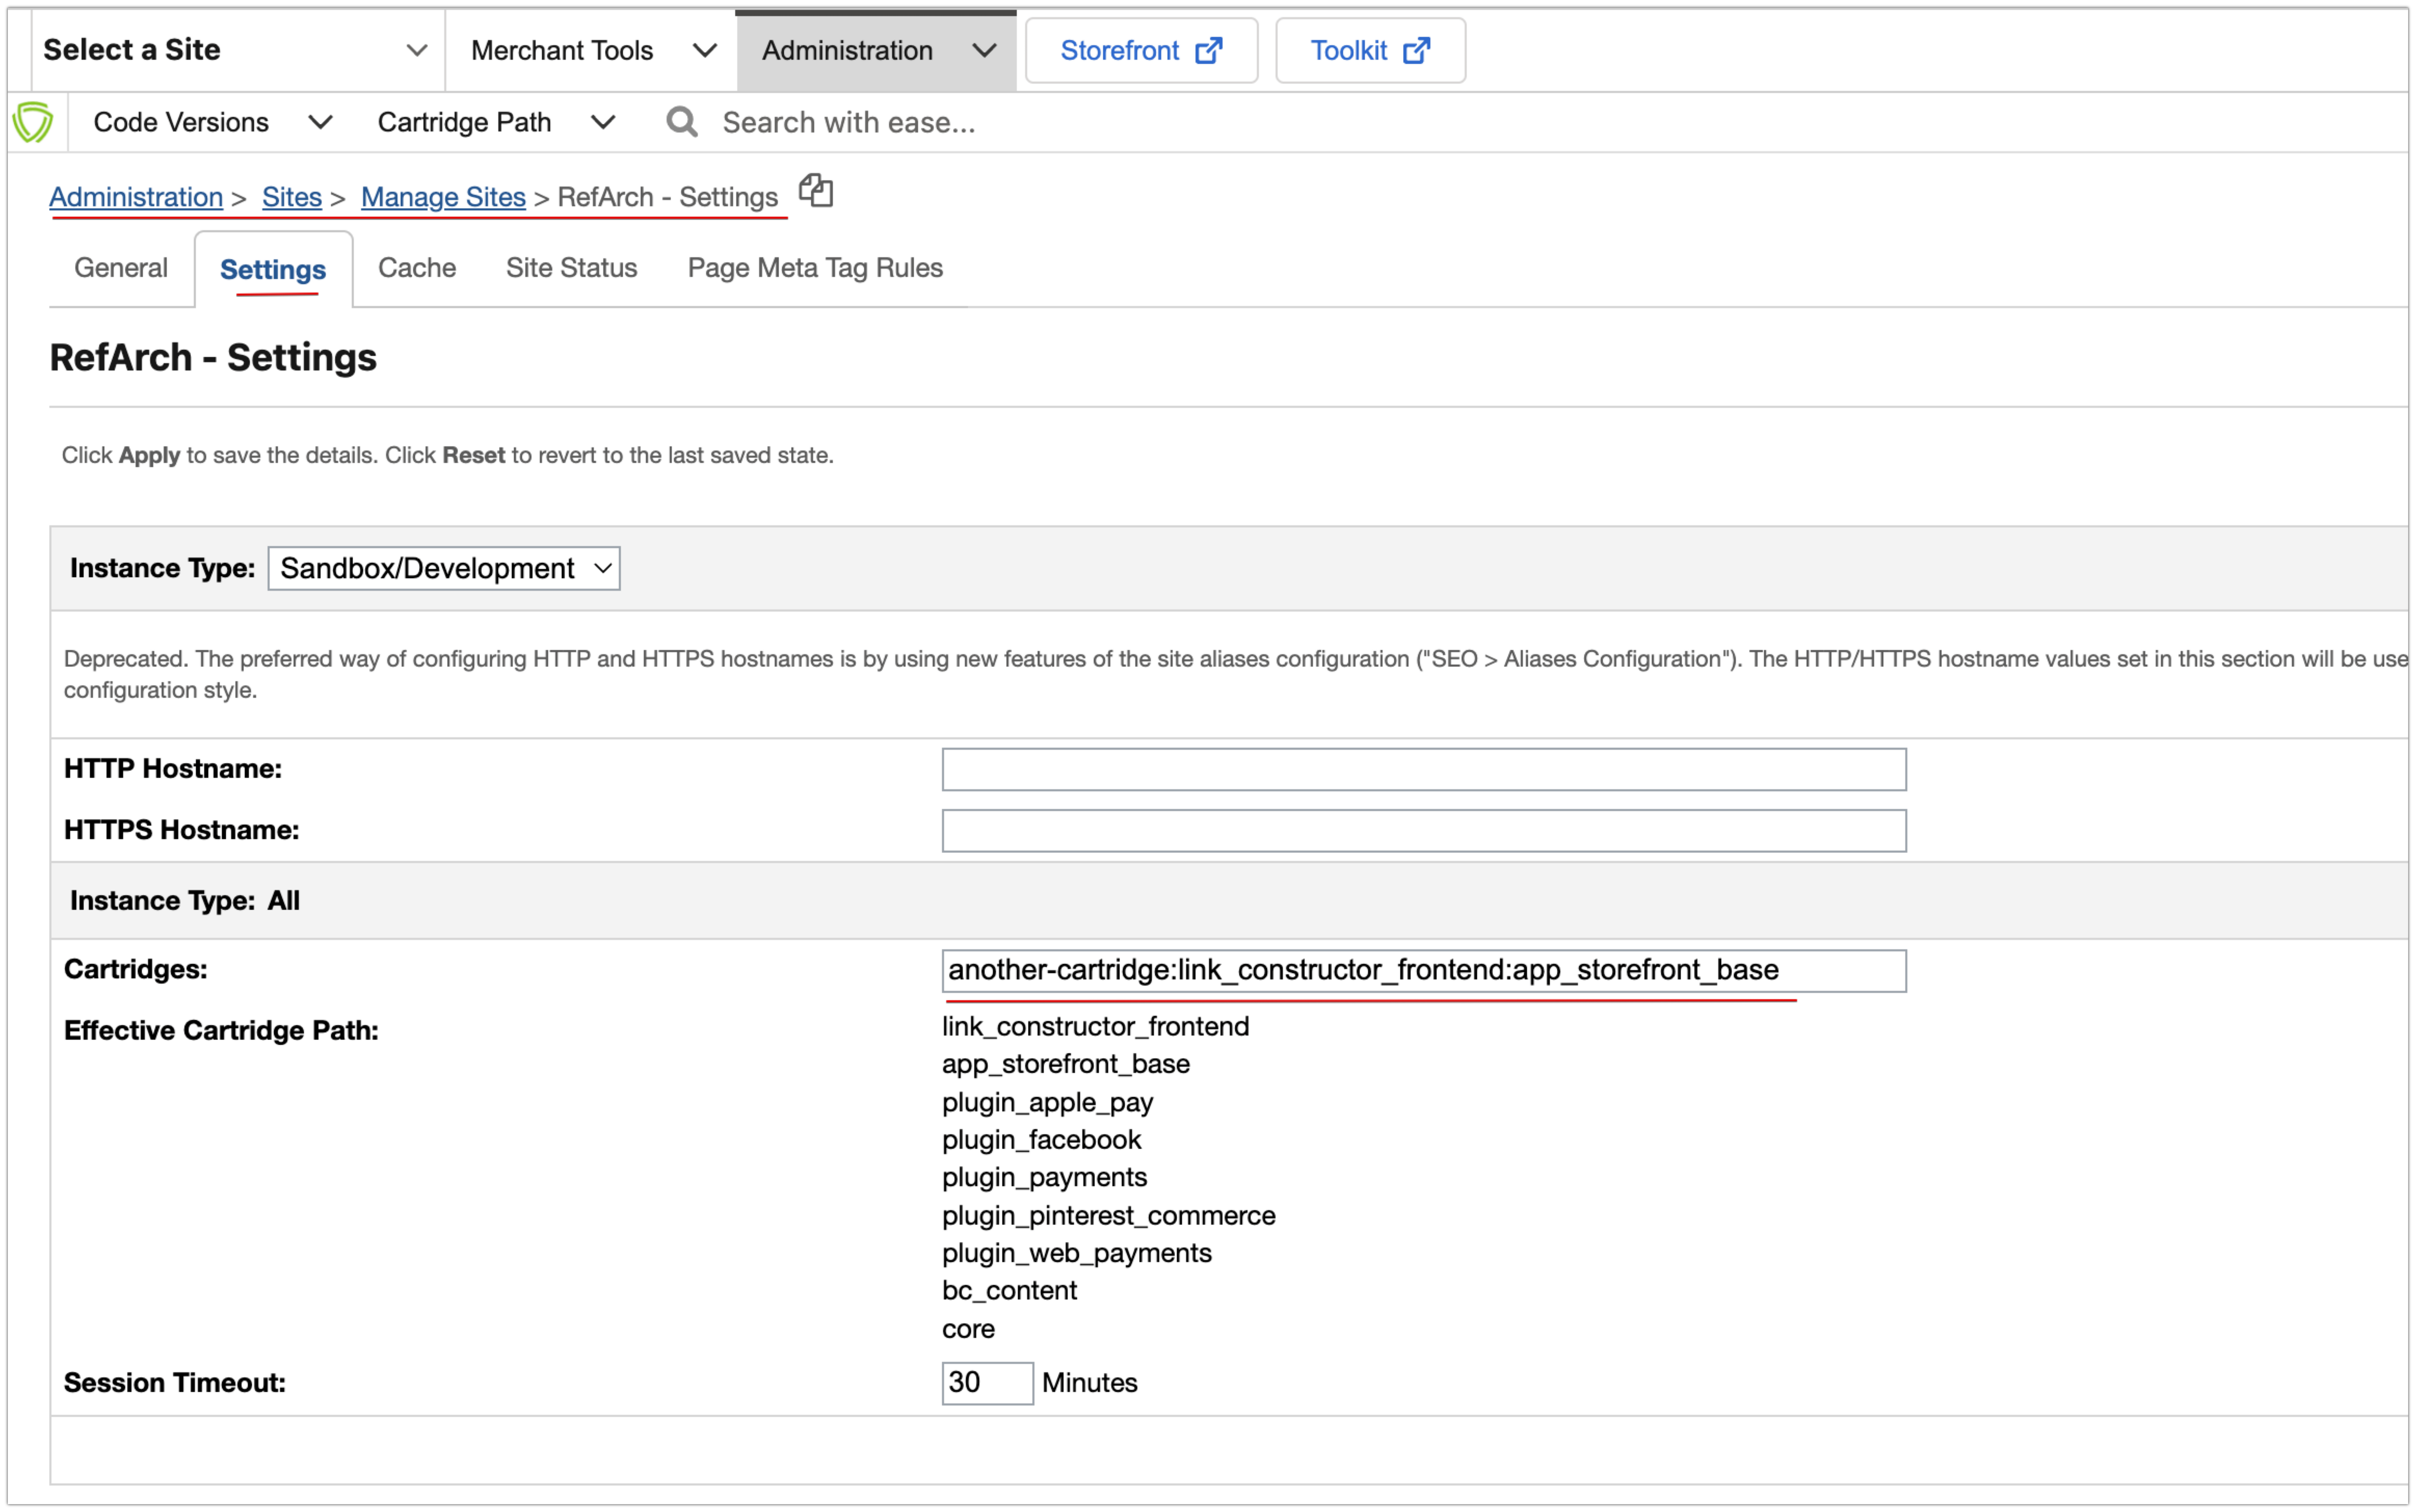
Manually updating via site management
NoteWhen installing more than one cartridge, please add them in the following order:
link_constructor_connect_customlink_constructor_connectlink_constructor_frontend
Troubleshooting
If none of the following resources solves your issue, please contact us at [email protected], and an engineer will be glad to assist.
Invalidating cache
Salesforce has a powerful cache enabled by default. If the frontend cartridge is not behaving as expected or not loading at all, it may be a caching issue.
Access Administration > Sites > Manage Sites >> Cache a > Cache** and select Invalidate.
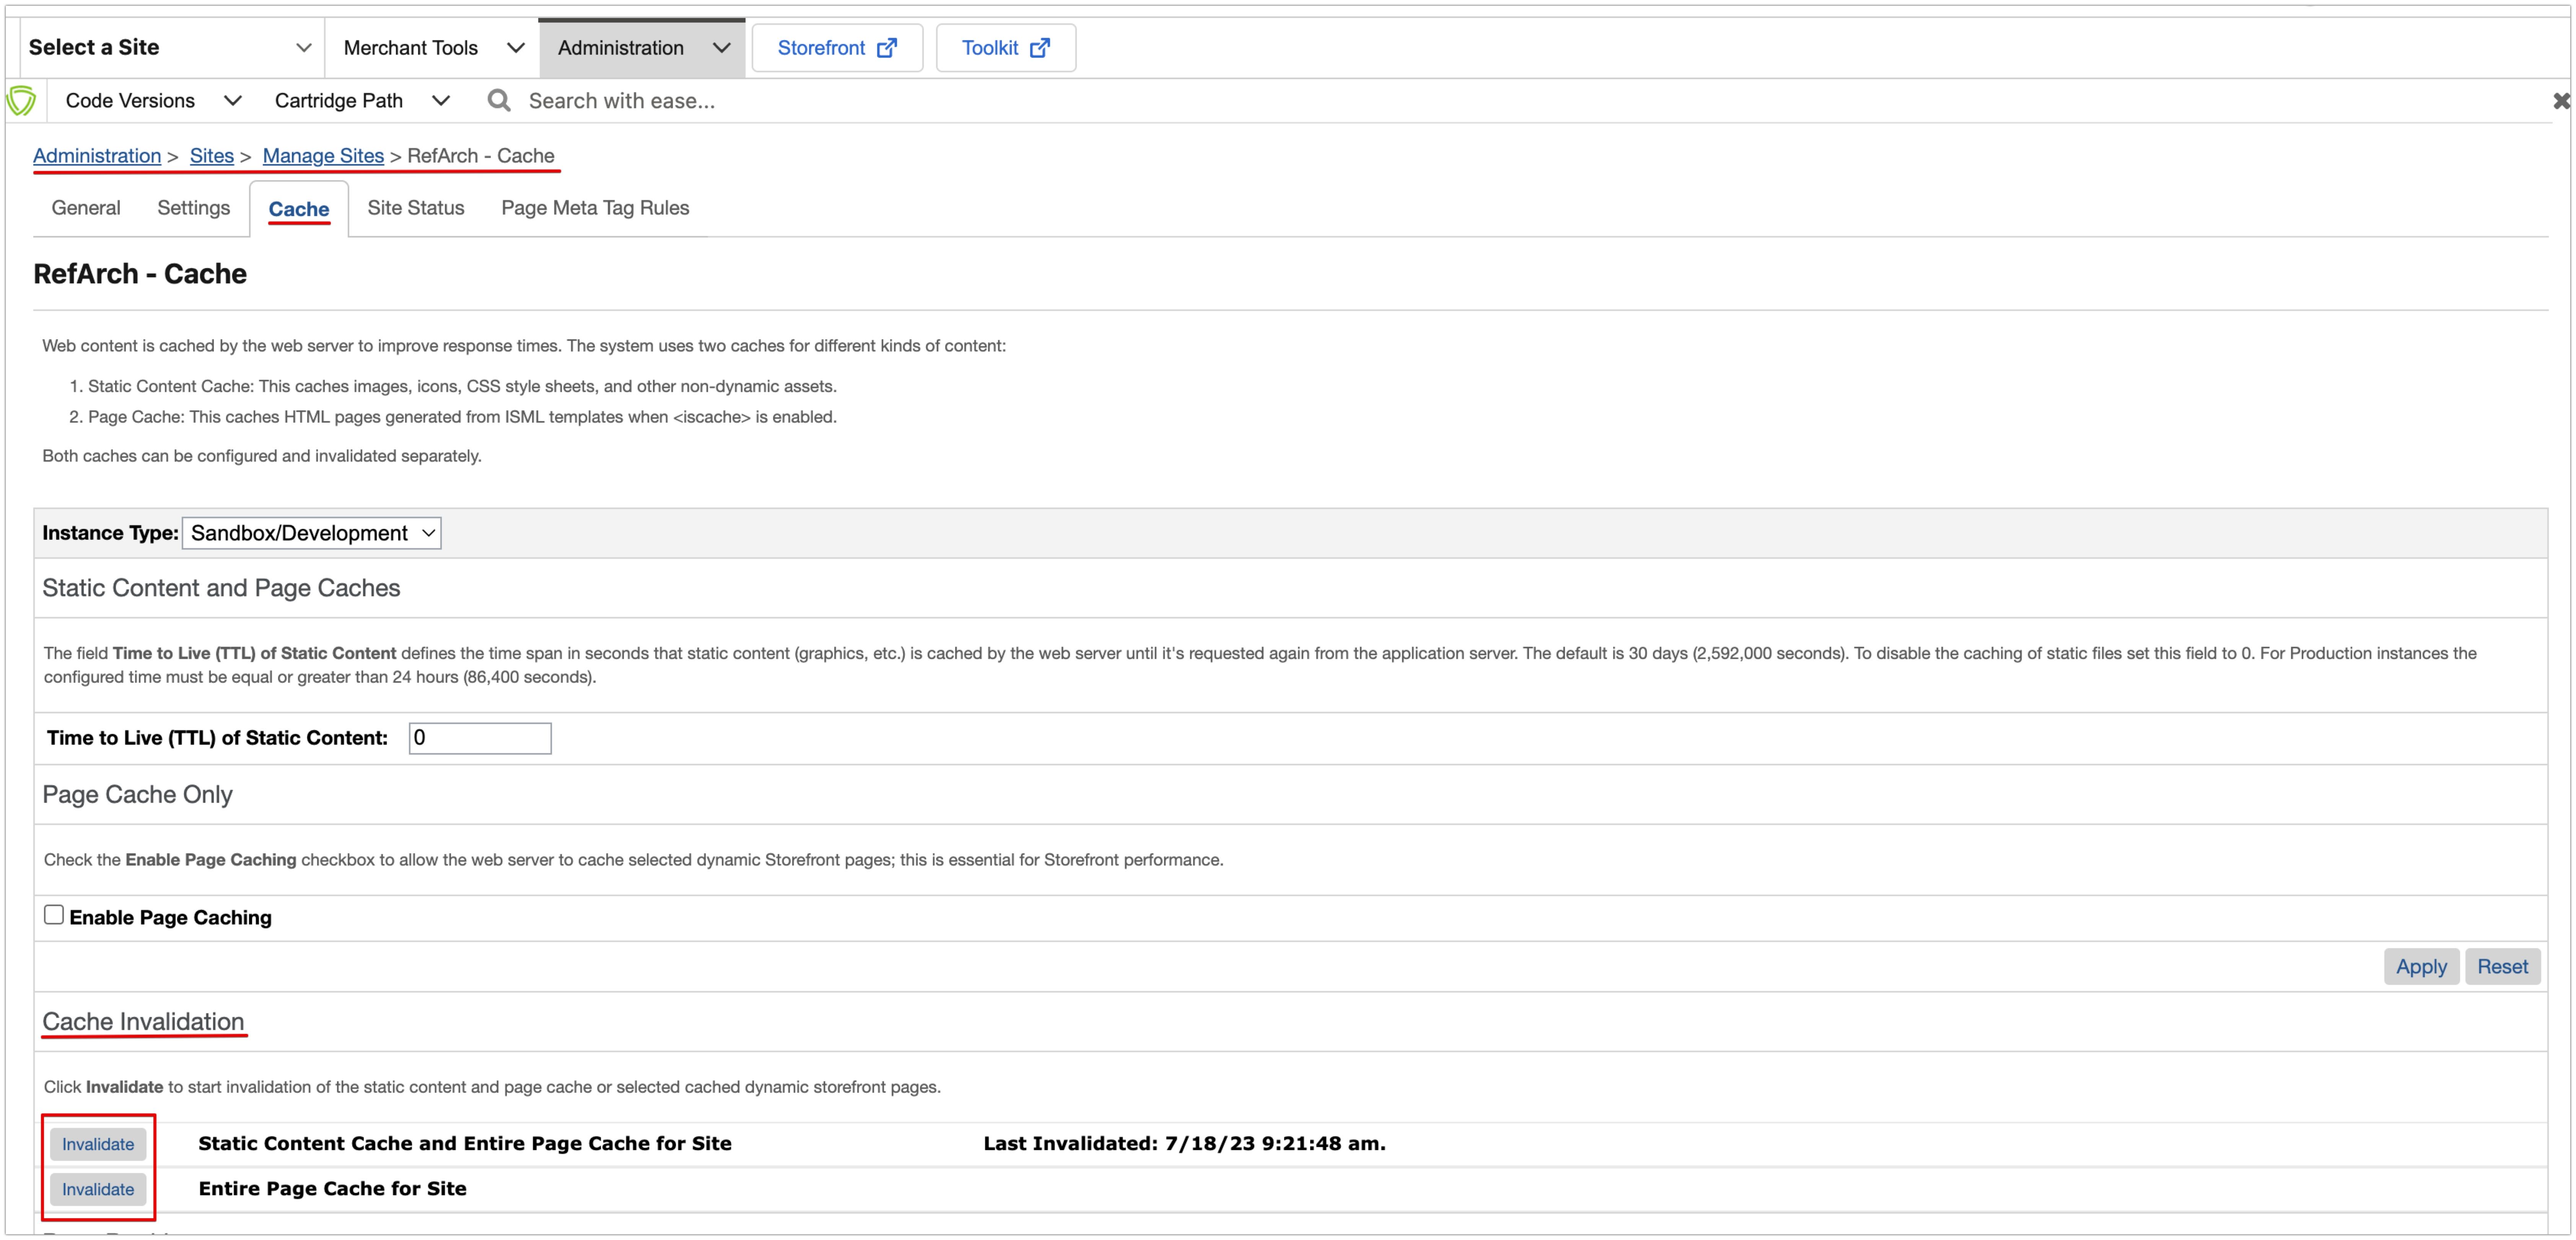
Invalidating cache through administration
Change the active version
Salesforce may cache the code version itself, and code changes might take longer to appear because of this. This behavior can be mitigated by changing the active version and changing it back.
Access Administration > Site Development > Code Deployment and follow the steps in the image below.

Refreshing cache by changing active version
Check for required hooks
The Constructor frontend cartridge relies on the app.template.htmlHead hook. It needs to be called in the htmlHead.isml template as follows:
${dw.system.HookMgr.callHook('app.template.htmlHead', 'htmlHead', pdict) || ''}Otherwise, our frontend components will fail to load.
Updated 3 months ago