Create a campaign
Companies can easily create sponsored listing campaigns on an advertiser's behalf and manage those campaigns from their Constructor dashboard. However, if a company wishes for advertisers to create and manage their own sponsored campaigns, the company can invite them to a dedicated Advertiser Dashboard.
This article walks through how to create a sponsored listing campaign from the Constructor dashboard.
Step 1: Enter campaign details

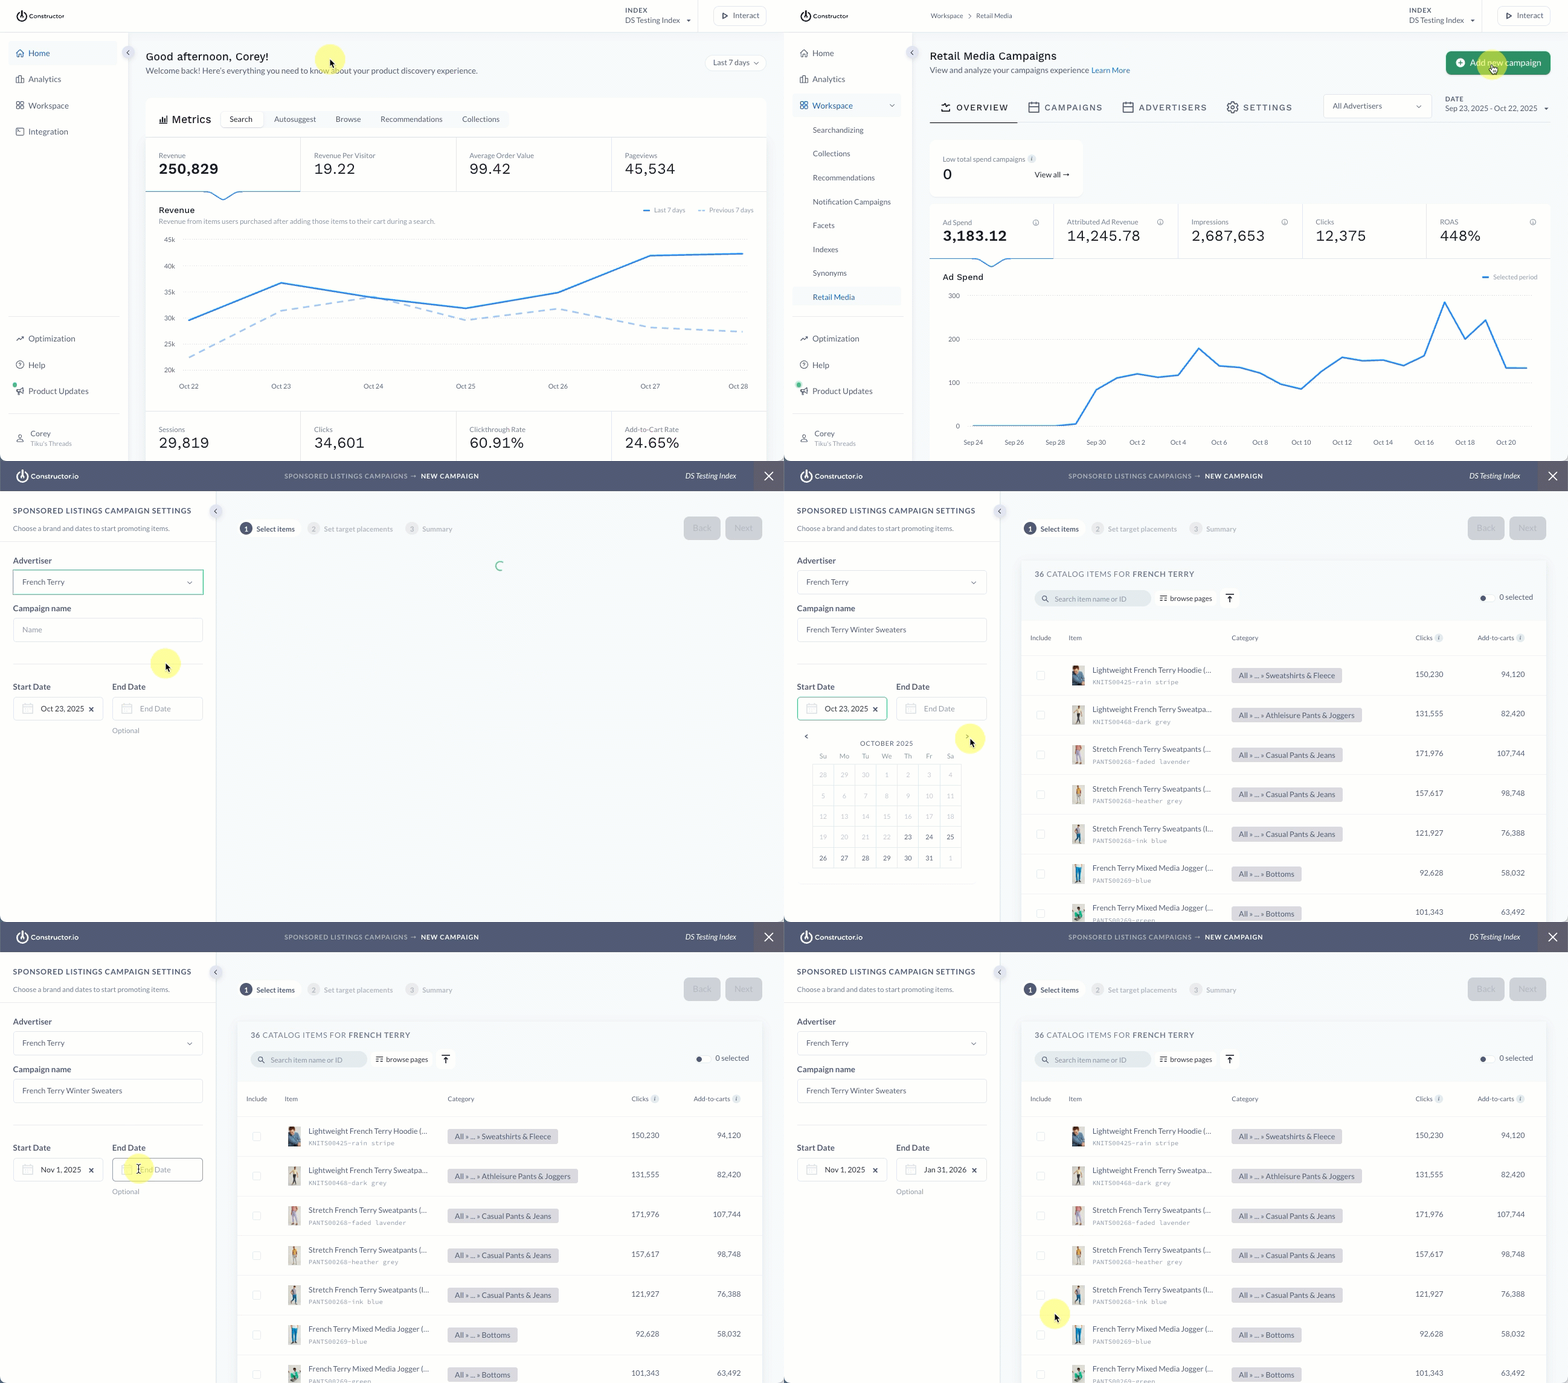
- Select Workspace in the side menu of the Constructor dashboard, then select Retail Media.
- Select + Add new campaign in the top-right corner of the page.
- On the pop-up, select Sponsored listings.
- On the left side of the page, select the Advertiser drop-down list and choose the desired advertiser.
- Enter a Campaign name in the field provided. This will help identify the campaign in the campaign listing.
- Choose a Start Date and End Date for the campaign. Selecting either date field expands a calendar picker, allowing you to select the desired date.
- The Start Date defaults to the current date, but you can change it to a future date if you are scheduling a future campaign.
- The End Date is optional but recommended for time-boxed campaigns.
Step 2: Select items to promote
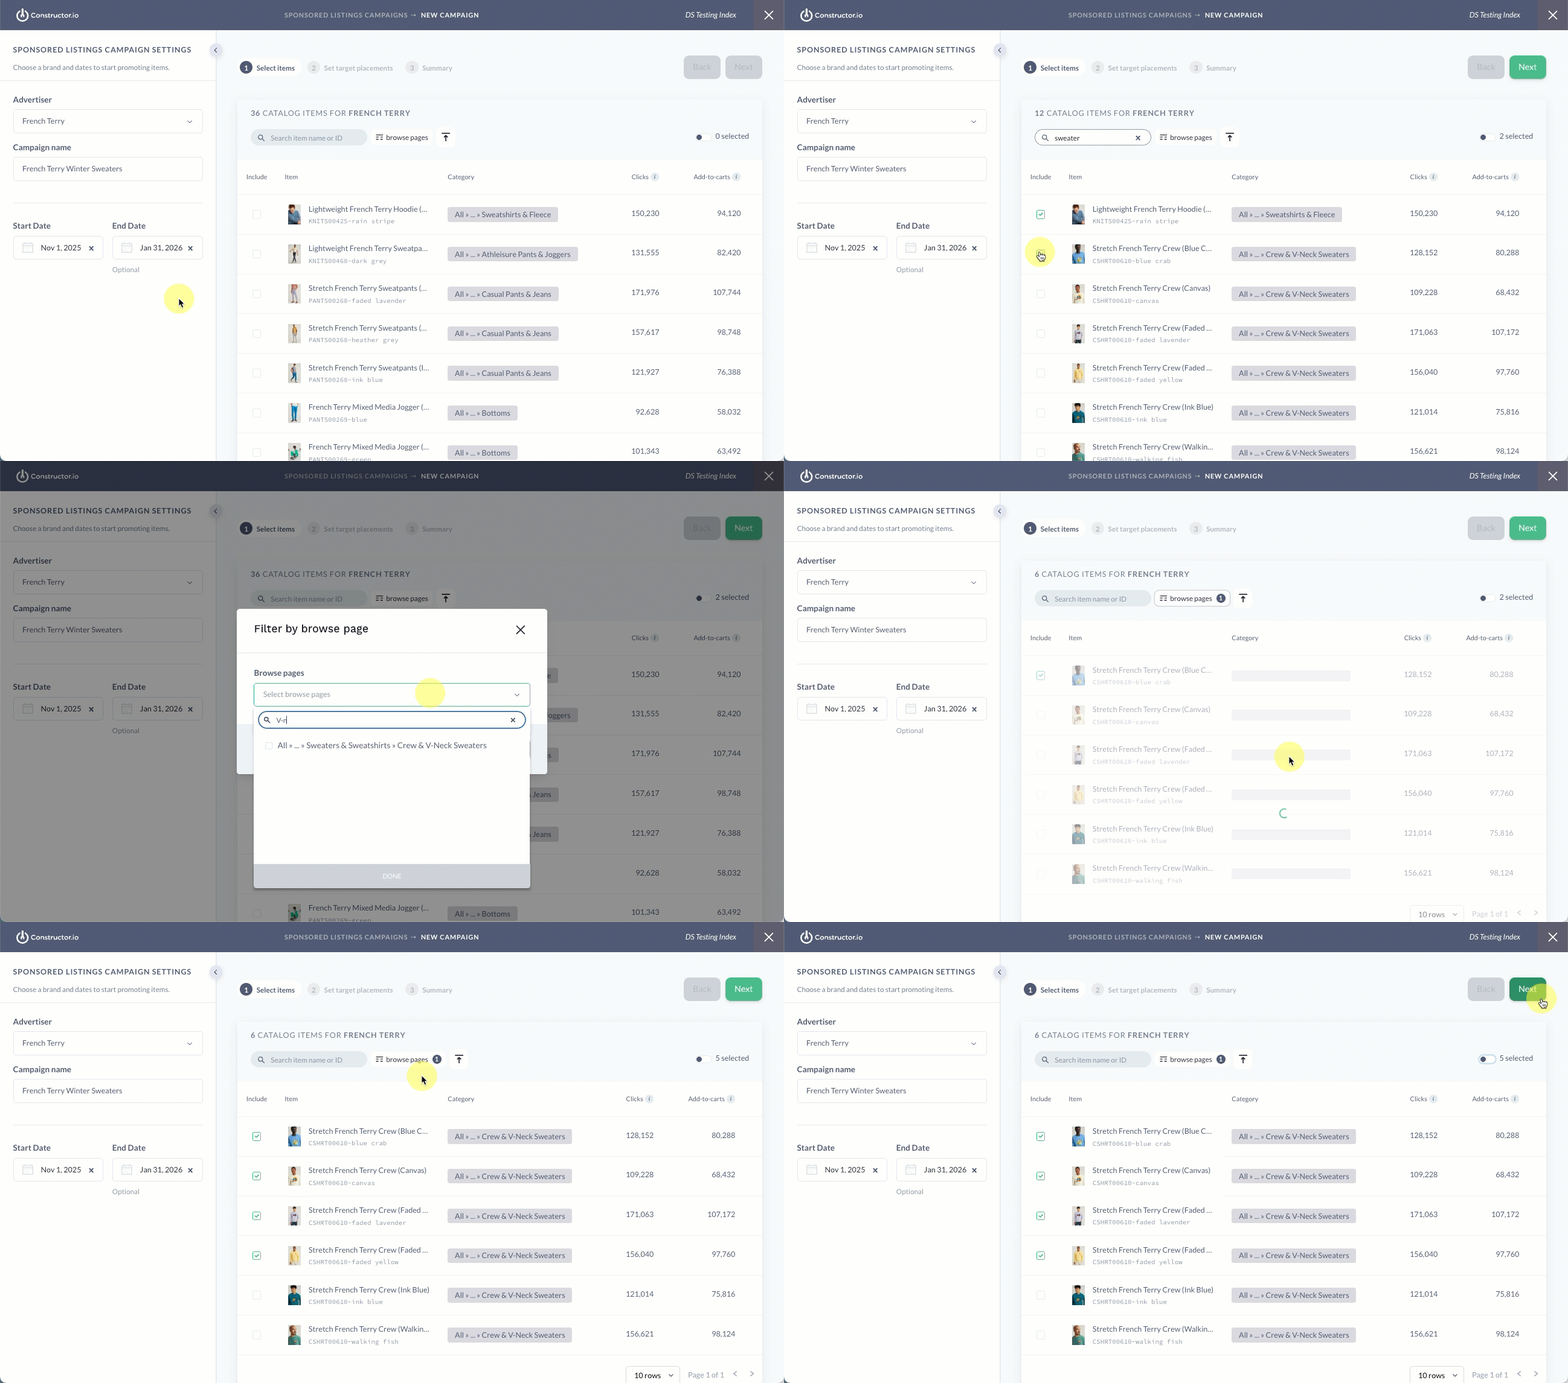
When selecting items to promote, you can search for them by item name or ID, scroll through the listing, or by items on specific browse pages.

- To search for a specific item, enter the item name or item ID in the search field at the top of the item listing.
- To choose items by browse page, select the Browse Pages filter at the top of the item listing.
- A pop-up with a drop-down list of available browse pages will appear. Choose the browse page(s) whose items you wish to view by selecting the checkmark to the left of each browse page name, then select Apply.
- Note: Selecting a browse page during this step simply helps you choose which items to sponsor. It has no impact on the actual browse page. That step comes later.
- To upload a CSV of items to promote, select the upload icon at the top of the item listing.
- You will automatically be prompted to choose a file from your device.
- You can select Download File Template to download a template file to your device.
- When you locate an item to promote, select the checkbox to the left of the item name.
- Once you’ve selected all the items you wish to promote, select Next in the top-right corner of the page.
Step 3: Choose target browse pages, keywords, and recommendation pods
Sponsored items display exclusively on pages, in search results, and in recommendation pods where they would organically appear. When setting up a campaign, you can select specific pods and sets of pages—browse pages or search query result pages—from the ones available for the items you selected.

Browse pages
You will have a set number of browse pages to choose from. These are browse pages where the selected items would organically appear.
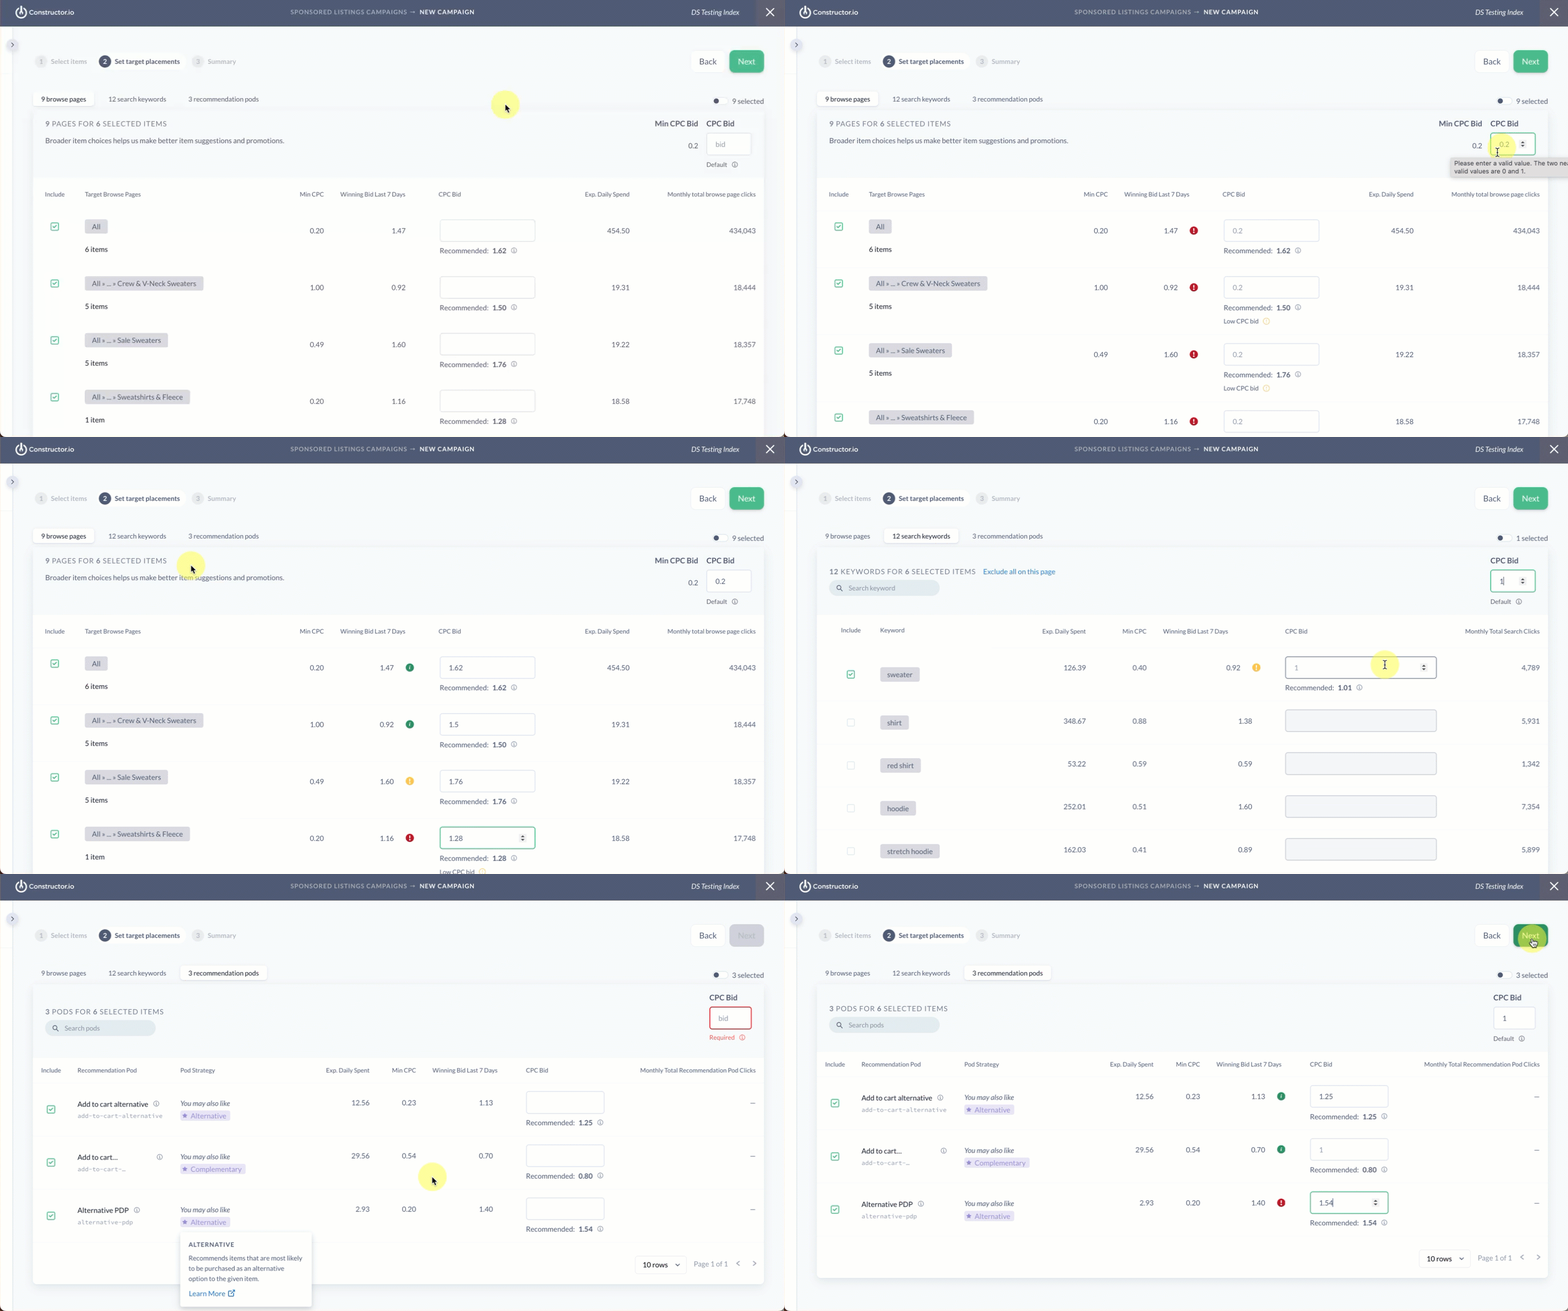
- Select the Browse Pages tab at the top of the page.
- To target a specific browse page, ensure you select the checkbox to the left of the page name.
- Next, define the cost per click (CPC) bid. You can do this in two places:
- Default CPC. You will need to set the default CPC for all selected browse pages by entering that amount in the CPC Bid field in the top-right corner of the page. This is the CPC used for all pages unless you’ve defined the CPC for a specific page.
- Specific page CPC. You can set the CPC for a specific browse page by entering that amount in the CPC Bid field on the right side of the browse page row. This amount will be used instead of the default CPC amount. This allows you to remain competitive for top browse pages.
Search keywords
A note on search query keywordsBy default, all selected search query results pages within the campaign adhere to an exact match logic. For example, if you select "Garden Sofa" as a search keyword, then your selected items will show for that keyword specifically and not the general "Sofa" keyword. This allows us to maintain target precision for only "Garden Sofa" results.
You will have a set number of search keywords to choose from. Again, these are search keywords for which the selected items would organically appear as results.
- Select the Search Keywords tab at the top of the page.
- To target a specific search keyword, ensure you select the checkbox to the left of the keyword name.
- Next, define the cost per click (CPC) bid. You can do this in two places:
- Default CPC. You will need to set the default CPC for all selected keywords by entering that amount in the CPC Bid field in the top-right corner of the page. This is the CPC used for all keywords unless you have defined the CPC for a specific keyword.
- Specific keyword CPC. You can set the CPC for a specific keyword by entering that amount in the CPC Bid field on the right side of the keyword row. This amount will be used instead of the default CPC amount. This allows you to remain competitive for top search keywords.
Recommendation pods
A note on recommendation podsAt this time, you can only sponsor items in pods with
Alternative,Complementary, andBestsellerstrategies. The Constructor team is hard at work on expanding to other strategies.
You will have a set of recommendation pods to choose from. Again, these are pods where the selected items would organically appear. Recommendation pods must be enabled to allow ads to appear. By default, all recommendation pods do not have advertising enabled. Learn more here.
- Select the Recommendation Pods tab at the top of the page.
- To target a specific pod, ensure you select the checkbox to the left of the pod name.
- Next, define the cost per click (CPC) bid. You can do this in two places:
- Default CPC. You will need to set the default CPC for all selected recommendation pods by entering that amount in the CPC Bid field in the top-right corner of the page. This is the CPC used for all pages unless you’ve defined the CPC for a specific page.
- Specific page CPC. You can set the CPC for a specific recommendation pod by entering that amount in the CPC Bid field on the right side of the pod row. This amount will be used instead of the default CPC amount. This allows you to remain competitive for top recommendation pods.
Once you have selected your target browse page(s), search keyword(s), and/or recommendation pod(s), select Next in the top-right corner of the page.
Minimum CPC recommendationsConstructor displays a minimum CPC recommendation below each CPC field. These recommendations are our estimate to help ensure the items stay visible even if other advertisers increase their bids. You can either follow the recommended minimum bid or adjust the amount according to campaign goals.
Step 4: Review campaign and budget
Your last step is to review your campaign details and set your daily budget. Your daily budget reflects the amount you wish to spend per day to promote items within the campaign.
Once a campaign reaches its daily budget amount, all campaign efforts are automatically paused. This means all promotions for items within the campaign stop. Campaigns automatically resume at midnight UTC.

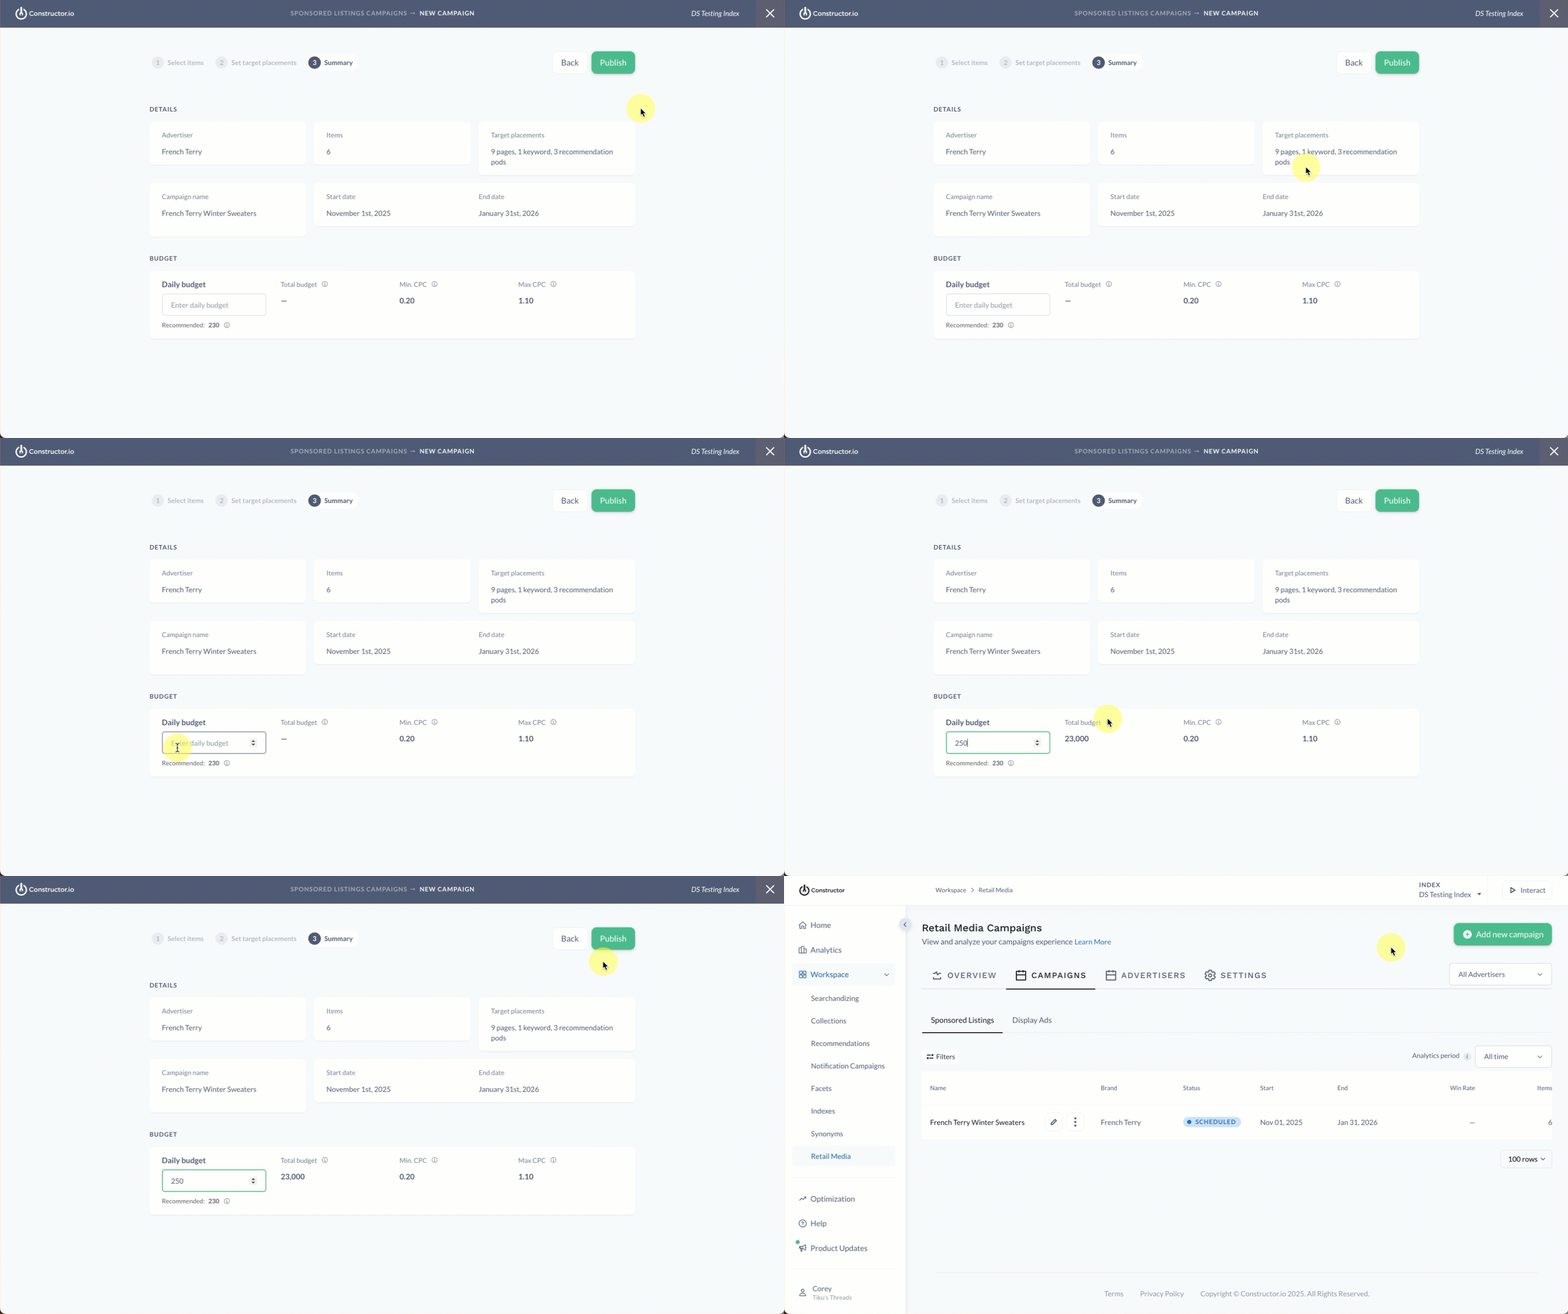
- Review the campaign details listed in the Details section at the top of the page. If you need to make changes, select the Back button in the top-right corner of the page.
- In the Budget section, enter your Daily budget in the field provided. The Total budget to the right of the field will adjust to reflect the total budget across the campaign dates you defined. If you are creating a campaign without a fixed end date, then you will see a Monthly budget.
- Select Publish in the top-right corner of the page to publish the sponsored campaign.
Updated 4 months ago