Configure global facets
Learn how to configure global facets and metadata in your Constructor dashboard.
Facet configurations allow merchandisers to customize facets—also known as filters—that help users narrow search results based on specific product attributes, such as price, brand, color, etc. These configurations control how facets are displayed, how they are sorted, and how they behave on product listing pages. Additionally, the facets here can be used to create searchandising rules.
Constructor makes configuring your catalog facets from your Constructor dashboard simple. This process is more efficient and user-friendly and includes tooltips and explanations of each configuration option.
This level of configuration was previously only accessible via API, but now merchandisers can gain full control over facet and metadata configurations without relying heavily on the customer integration team.
Additionally, Constructor now allows merchandisers to configure any metadata item as a facet.
Important
Facets are no longer configurable via a catalog upload. You must configure facets using either our API or the Global Facet Configuration page (as outlined below).
Facet types
When configuring a facet, you can choose the format in which the facet data will be returned and displayed.
Multiple
With the Multiple format, you can present facet options as a list of individual items. For example, for the facet "Brands," this format would present all available brands in a list that users can choose from when filtering items.
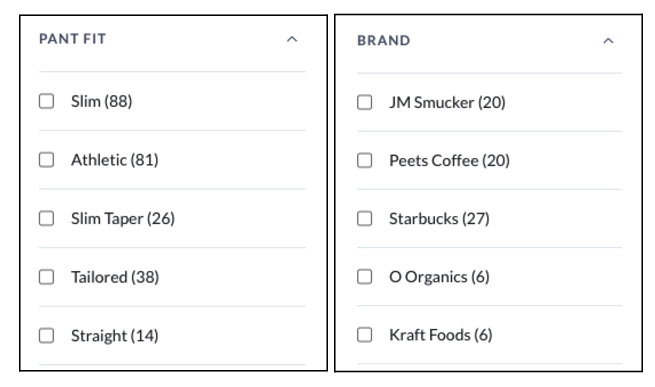
Example facet options in the Multiple format
Range
With the Range format, you can make numerical data, such as price, ratings, and weight, filterable. You have two range options: boundaries and buckets.
Boundaries
This option is ideal for data that users can filter along a minimum and maximum range. For example, a price slider that indicates the lowest and highest prices displayed on the page. Users can drag the indicators along the slider to define their filter range.
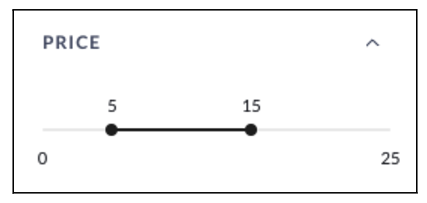
Example facet range in the Boundaries format
Buckets
This option is ideal for data that is best filtered by predefined buckets. For example, a rating system that allows users to view products with a 4-star or 4-star and up rating or price range buckets that allow users to view products within the defined range.
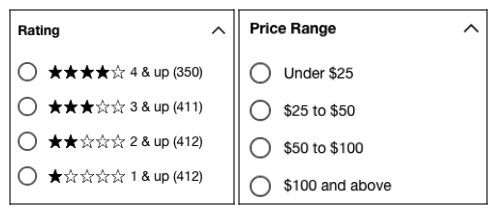
Example facet options in the Buckets format
Important
Changing large facets from ranged to multiple (that is, changing the "Price" attribute from Range to Multiple) will impact system performance.
If you wish to discuss these implications before making a change, please reach out to your CSM.
Navigate to global facet configuration
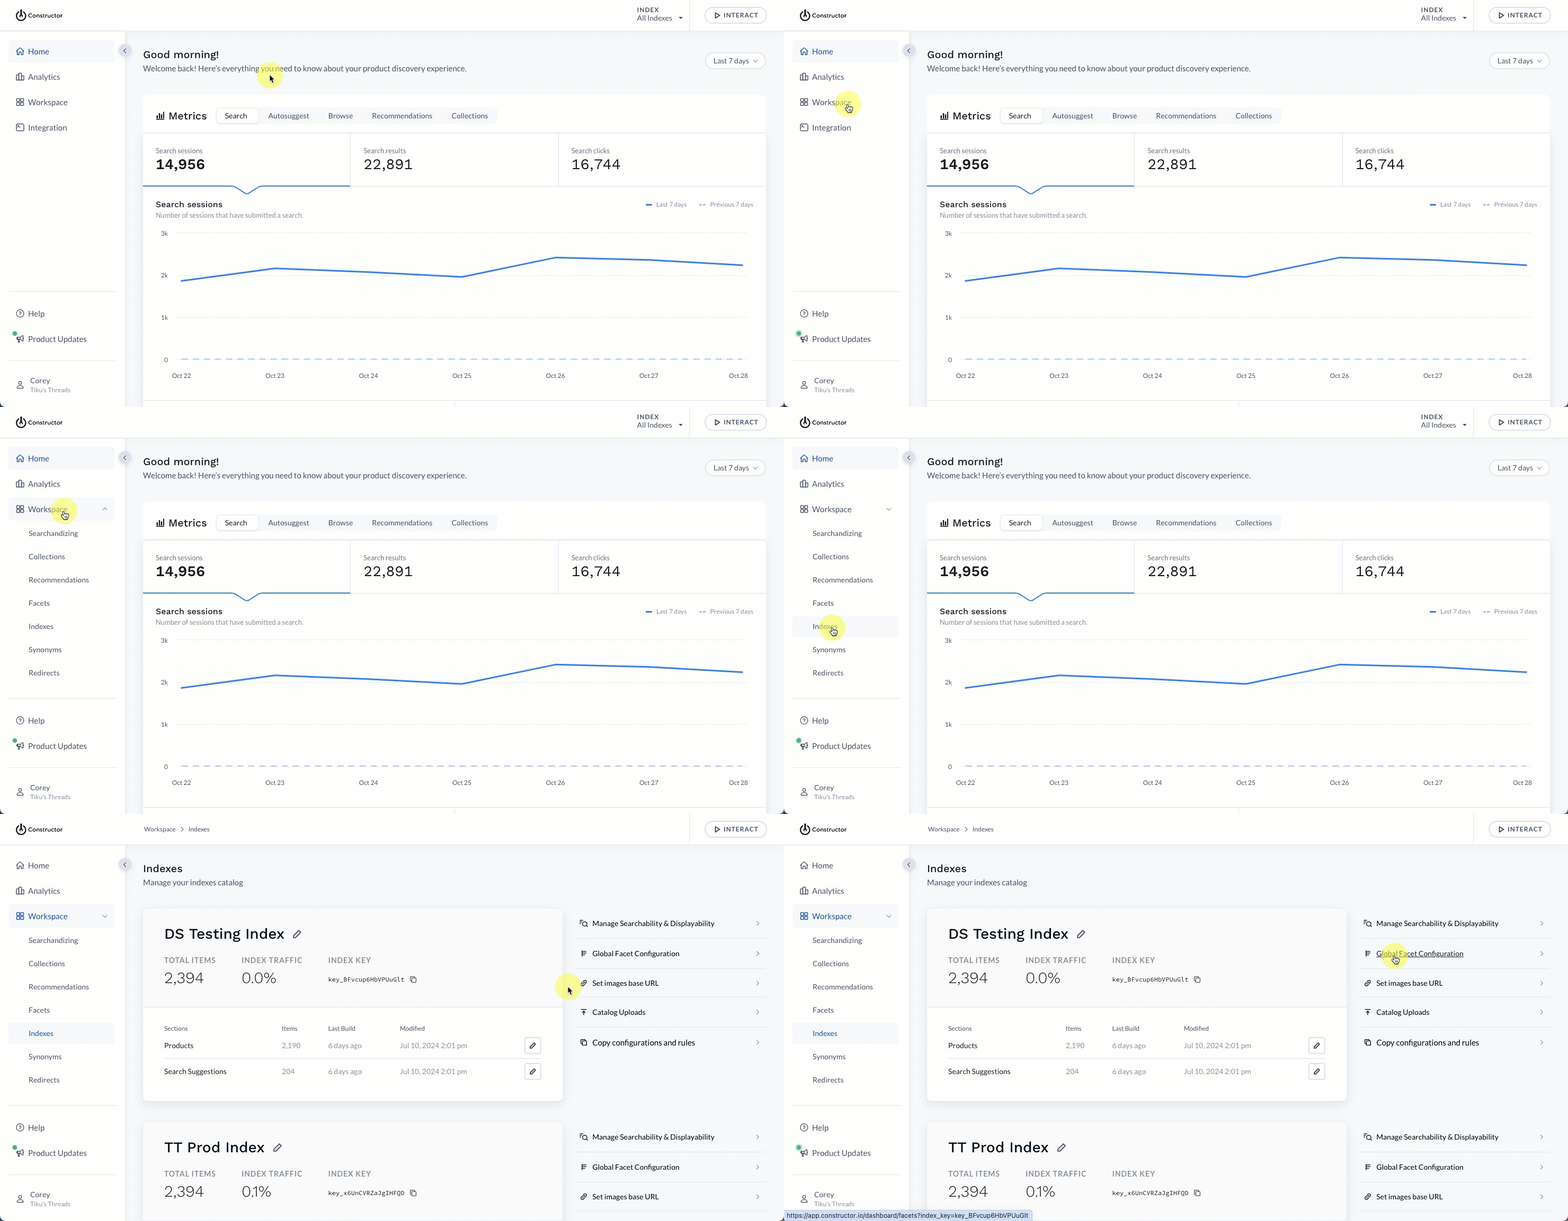
- Select Workspace in the side menu of your Constructor dashboard.
- Select Indexes.
- Locate the index whose global facets you wish to configure.
- Select Global Facet Configuration to the right of that index.
Configure a facet
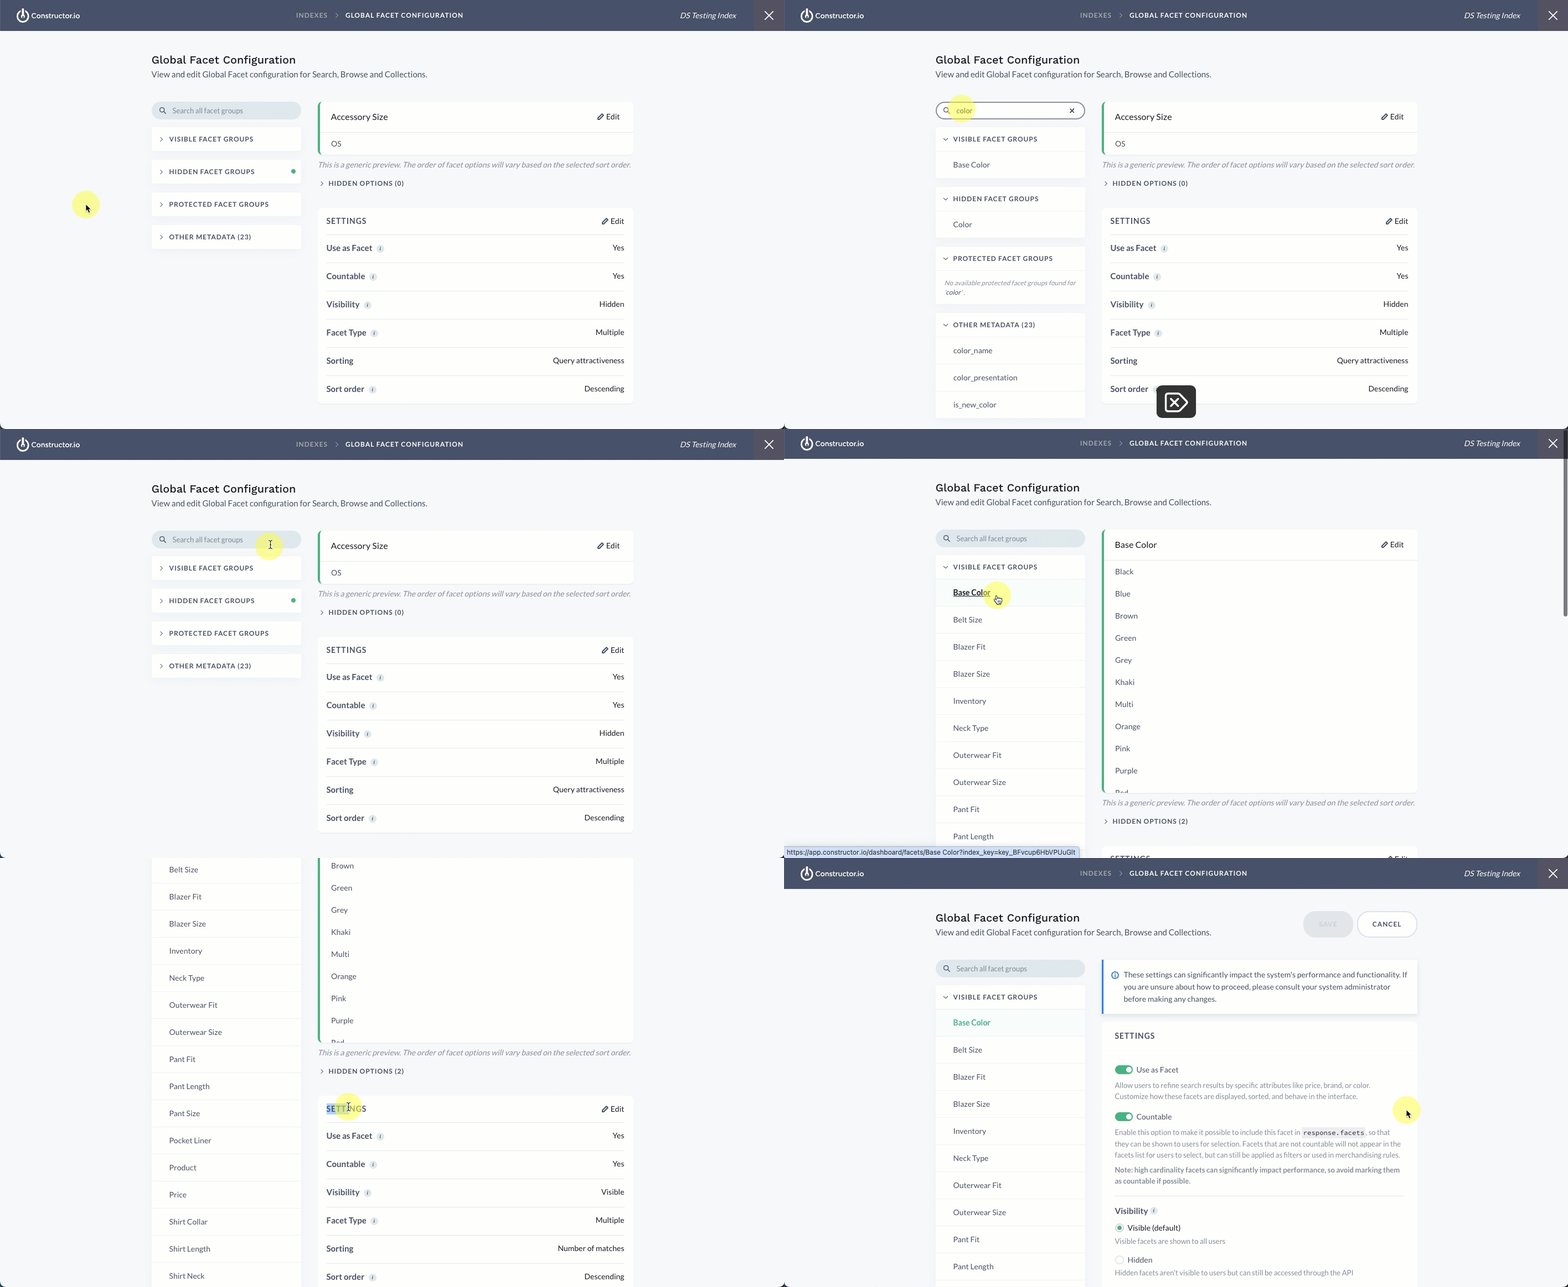
- Locate the facet you wish to configure. You have two options for locating:
- Search. Use the search field on the left side of the page to search for the facet by name.
- Facet groups. Expand any facet group (Visible, Hidden, and Protected) to search for the facet.
- Locate the Settings section on the right side of the page and select Edit.
You can now configure metadata as facets
If you wish to configure a metadata item as a facet, expand this drop-down and choose the metadata item from the list. You can then configure it using the flow outlined below.
As a reminder, facets are no longer configurable via a catalog upload. You must configure facets using either our API or the Global Facet Configuration page (as outlined below).
Configure basic settings
Basic settings are the same for all facets, regardless of the type.
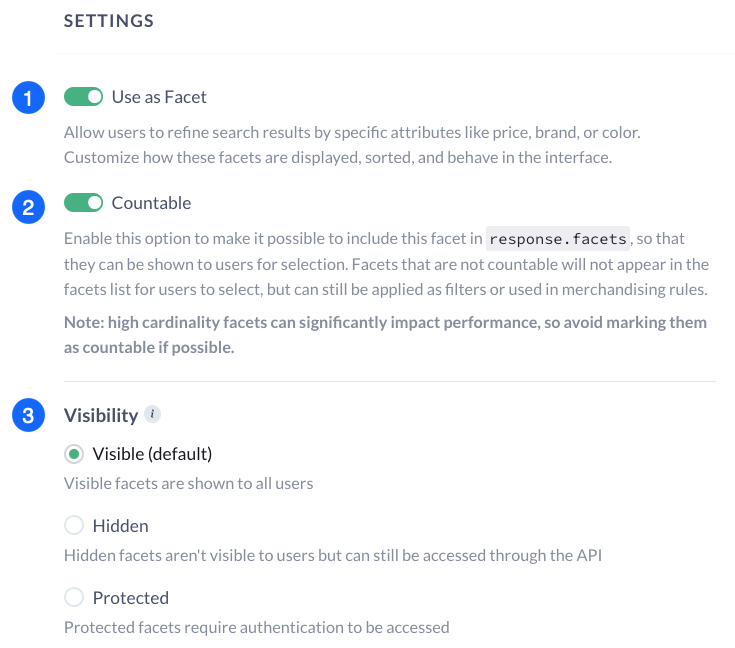
- Enable the Use as Facet toggle if you wish to configure this facet. Doing so will make other settings available to edit. Enabled toggles display green.
- The Countable toggle is enabled by default. This makes it possible to include the facet in
response.facetsso that they can be shown to users for selection. Facets that are not countable will not appear in the facets list for users to select but can still be applied as filters or used in merchandising rules.- Disabling this toggle for a visible facet will hide the facet from being shown.
- Disabling this toggle for a hidden facet will hide the facet from users but still allow you to make individual requests through request parameters.
- Disabling this toggle for a protected facet will hide the facet on the item level and also prevent it from being shown in
response.facets. - Note: Enabling the countable toggle for high cardinality facets can impact the performance of the system. Please avoid marking facets as countable if possible.
- Choose your Visibility preference for this facet.
- Visible. Visible facets are available to users as filters.
- Hidden. Hidden facets are hidden from user as a filter but are still available for searchandising. It also appears in the API response when the specific API parameter is requested.
- Protected. Protected facets will only appear in the response if an authentication token is passed through parameters.
Choose facet type
Once you configure the basic details of a facet, you’ll need to choose the facet type. Each type has its own additional configurations, which we walk through below.
Multiple
Choosing Multiple allows you to display the facet options as a list of individual options. For example, choosing this option for the facet "brands" would present all available brands as a list that users can choose from when filtering.
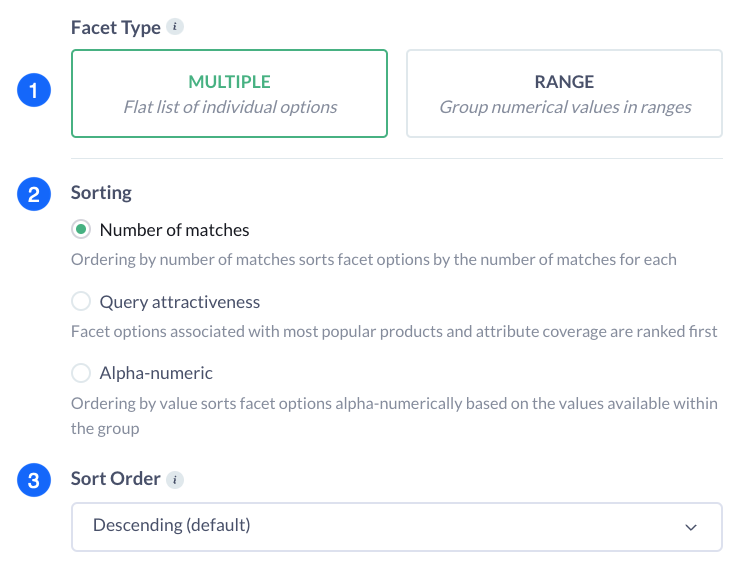
- Select Multiple as the facet type.
- Choose your Sorting option.
- Number of matches. Sort by the number of results that match the option.
- Query attractiveness. Sort by the most relevant and attractive options for the user. For example, listing facet options based on how often users filter by the option. Those options with the highest engagement would appear at the top.
- Alpha-numeric. Sort alphabetically by the facet option name. For example, listing alphabetically by brand name within the "Brand" facet.
- Choose your Sort order.
- Ascending (default). Order from smallest to largest or first to last (for example: 0-10, A-Z, etc.).
- Descending. Order from largest to smallest or last to first (for example: 10-0, Z-A, etc.).
After configuring these final settings, you can select Save in the top-right corner of the page to save your configuration.
Range
Choosing Range allows you to group the facet options into ranges. For example, choosing this option for the facet "price" would allow users to filter for and view items within a specific price range.
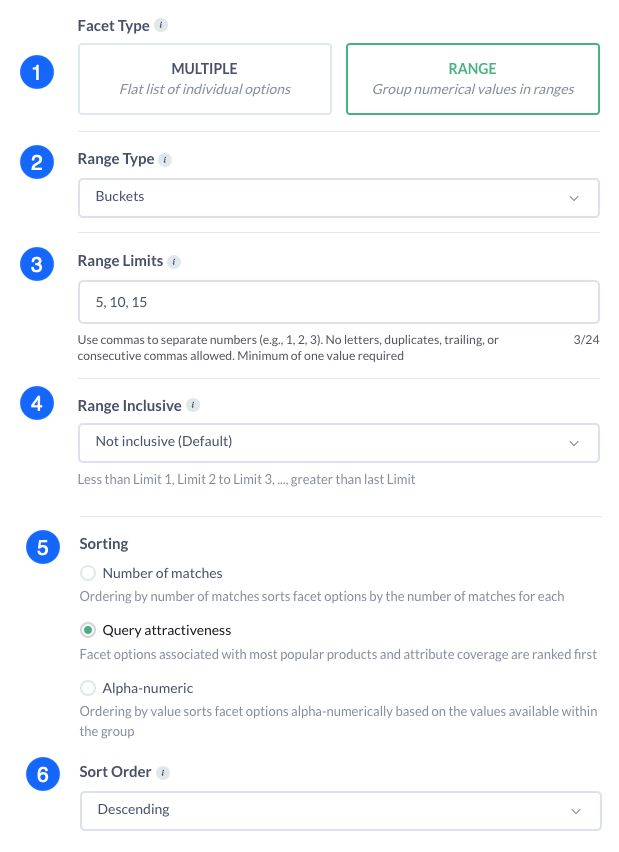
- Select Range as the facet type.
- Choose your Range Type.
- Boundaries. Suitable for numerical data you wish to group into a range (for example: price, weight). For example, a price slider showing the lowest and highest prices where a user can select any range within those limits.
- Buckets. Suitable for numerical data you wish to group into buckets. For example, rating buckets that allow a user to view 5-star reviews, 3+ star reviews, and so on.
- Define your Range Limits in the field provided. This is only required if you chose Buckets as your range type.
- This list defines the start and end for each bucket. For example, entering 5, 10, 15 in the field provided would create the following buckets: anything 5 or below, 5-10, 10-15, and 15 and higher.
- Use Range Inclusive (outlined below) to define how the beginning and end of these buckets are treated.
- Choose your Range Inclusive option. This is only required if you chose Buckets as your range type.
- Above. Each bucket includes all the buckets that come after it (for example: ratings: 1+ stars, 3+ stars, 5+ stars, etc.).
- Below. Each bucket includes all the buckets that come before it (for example: $50 and below, $100 and below, etc.).
- Not Inclusive. Buckets do not include each other. They are equal to the specific bucket defined (for example: only 5-star items, etc. ).
- Choose your Sorting option.
- Number of matches. Sort by the number of results that match the option.
- Query attractiveness. Sort by the most relevant and attractive options for the user. For example, listing facet options based on how often users filter by the option. Those options with the highest engagement would appear at the top.
- Alpha-numeric. Sort alphabetically by the facet option name. For example, listing alphabetically by brand name within the "Brand" facet.
- Choose your Sort order.
- Ascending (default). Order from smallest to largest or first to last (for example: 0-10, A-Z, etc.).
- Descending. Order from largest to smallest or last to first (for example: 10-0, Z-A, etc.).
After configuring these final settings, you can select Save in the top-right corner of the page to save your configuration.
Updated 4 days ago